
ACL (Access Control List) #
The Access Control List (ACL) feature allows you to enter a single IP address or a comma separated list of IP addresses to allow access to the system. Essentially, this means whatever IP address is in the ACL field will have access to the specified Panels of the software. If the field is left blank your Grievance App is open to the world. This feature is useful for those who wish to lock down their Grievance App to certain clients, to just their internal network or just to list of IP addresses.
ACL List #
The ACL List is pretty straightforward as it’s just a simple Textbox field in which you can insert a single IP address or a comma separated list of multiple IP addresses. For now, it only accepts the full IP address format of xxx.xxx.xxx.xxx. Eventually we plan to accept an IP range format, wildcard format, etc. but for now let’s keep it basic. If you insert multiple IP addresses you have to use the Comma Separated List format of xxx.xxx.xxx.xxx, yyy.yyy.yyy.yyy.

Note:
IPs cannot have a trailing comma otherwise a validation error will be thrown.

#
Apply To #
After the ACL List is populated you can then choose an Apply To option. The Apply To option states which panel(s) the ACL will be applied to. There are four options in the Apply To dropdown that you can choose from. The first option is called “Disabled” which means the ACL feature will be Disabled. The second option is called “All” which means the ACL will be applied to all Panels in the Grievance App. The third option is called “Client Portal” which means the ACL will only be applied to the Client Portal. The last option is called “Staff Panel” which means the ACL will only be applied to the Staff/Admin Panel.

Example Usage #
Let’s go through an example together so we can see how this feature works. Let’s say we want to lock down our Grievance App and we only want the following IPs to have access to the entire system (192.168.100.100, 192.168.100.101, 192.168.100.102). We would go to Admin Panel > Settings > System and scroll down to the ACL section. Now, since we have multiple IP addresses we have to use the comma separated list format. In the ACL List textbox we can enter the following 192.168.100.100, 192.168.100.101, 192.168.100.102. Since we would like to lock down our entire Grievance App we can choose the All option in the Apply To dropdown. Once complete we can Save Changes and from then on only the specified IP addresses can access the Grievance App. Anyone else trying to visit the site will be denied with Access Denied error.
Agent CSV Export #
Admins are now able to download a CSV export that displays all Agents in the system as well as their access to each Department.
Admin Panel | Agents Tab | Agents

- Click the down arrow beside ‘More’ and choose the ‘Export Agents’ option.
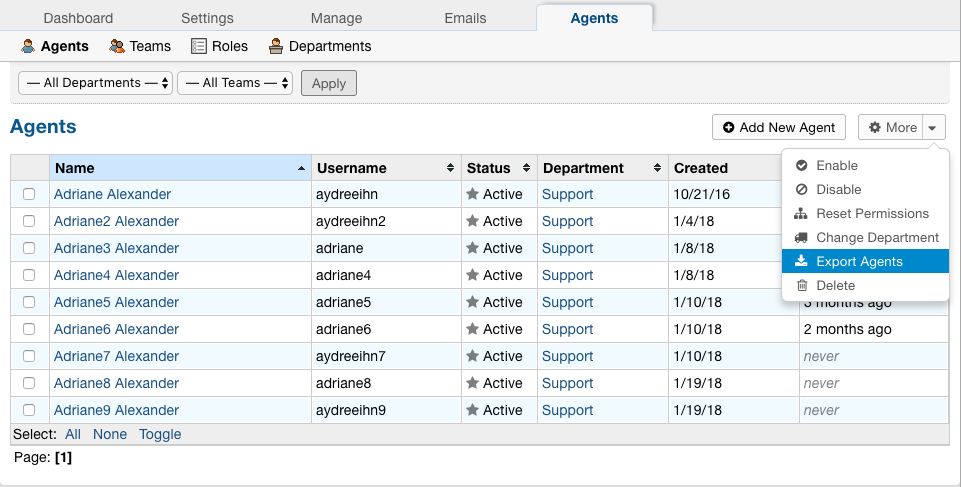
CSV Output: #

The output shows each Agent, their Username, and their Status as well as the Permissions they have. Each additional column shows the Departments in the system as well as each Agent’s role for that Department. If the Agent does not have access to a Department, the Role is left blank.
Archiving Departments and Help Topics #
Occasionally it could become necessary to no longer use certain Departments or Help Topics within a Grievance App. Even though they will no longer be used in the future, there could be some Grievance App that are still assigned to the Department or Help Topic. In addition, there are important Dashboard Statistics already stored. To resolve these issues, Admins may now choose to Archive Departments or Help Topics.
Departments: #
Departments can have a status of Active, Archived, or Disabled.
Active departments can be selected for new Grievance App and used throughout the system as usual.
Archived departments may not be chosen for any new Grievance App. If a closed grievance receives a response from a user and has an Archived department, a new grievance will be opened referencing the grievance’s old title and number. It will have the System Default chosen as the Department.
Closed grievance in Archived Department:


User response to the Closed grievance:

A new grievance is now opened referencing the grievance’s old title and number if a User replies by email to the closed grievance.
Disabled departments may not be chosen for any new Grievance App either, however, if a closed grievance receives a response, the system will reopen the grievance.
Closed grievance in Disabled Department:

User response to the Closed grievance:

#
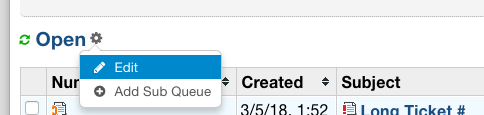
Changing the Department Status: #
- Go to: Admin Panel | Agents Tab | Departments
- Click a Department to modify.


-
- Modify multiple Departments at once.
An agent can change the Status of multiple Departments at once by selecting the checkbox beside each Department to modify and selecting the desired option in the ‘More’ dropdown

#
Help Topics: #
Help Topics behave in the same way as Departments. They may have a status of Active, Archived, or Disabled.
Closed grievance in Archived Help Topic:


User response to the Closed grievance:

A new grievance is now opened referencing the grievance’s old title and number.
Closed grievance in Disabled Help Topic:
 User response to the Closed grievance:

Changing the Help Topic Status: #
- Go to: Admin Panel | Manage | Help Topics
- Click a Help Topic to modify.


-
- Modify multiple Help Topics at once.
- An agent can change the Status of multiple Help Topics at once by selecting the checkbox beside each Help Topic to modify and selecting the desired option in the ‘More’ dropdown.

When viewing Dashboard Statistics for Departments and Help Topics, Agents will be able to see the statistics for Disabled or Archived items, and it will state whether the items were Archived or Disabled.
Departments:

Help Topics:

Collaborators #
Collaborators are additional participants that may be included in a Grievance’s communications.
This document will outline changes that have been made to how this feature works.
New Features: #
- Add collaborators as well as CC them when opening a grievance from the Agent Panel.
- Add collaborators as well as CC them when replying to a grievance as an Agent.
- Manage collaborators (add/remove collaborators).
- Change the email address where a grievance is sent out from.
- View recipients that receive a reply from an agent.
- As an end user, there is now an icon on the grievance list view to determine if you are a collaborator.
- New Email Template variables.
- New setting to hide Grievance App where the User is a Collaborator in the Web Portal.
Collaborators on Grievance Open: #
When an Agent creates a Grievance on behalf of a User, they now have the option to add Collaborators.
They also have the option to alert all (User and Collaborators), alert only the User, or do not send an email alert.
*Note: If the ‘New Grievance by Agent’ autoresponse is disabled Agents to not have the Grievance Notice options.

Collaborators on Grievance Reply:
Similarly, an Agent can add Collaborators or choose which Collaborators receive an email when replying to a Grievance.
Initially upon viewing a Grievance, the Agent can see how many Collaborators the Grievance has.
Collaborators that are removed by clicking the ‘x’ in the left corner of the their name will be disabled in the Grievance,
meaning they will no longer receive any of the Agent’s responses.

Disabled Collaborators can easily be Enabled again by reselecting and enabling them.


To completely remove a Collaborator, the Agent must go to ‘Manage Collaborators’.
Manage Collaborators:
There are several places where an agent can go to manage collaborators. The first is beside the User’s name on the grievance.
There is a group icon with the number of collaborators the grievance has.

The second place is in the drop down menu next to the grievance settings icon. There is an item to ‘Manage Collaborators’.

Finally, you can manage collaborators by clicking the Collaborator listing at the bottom of the Grievance or by
clicking in the expanded Collaborators menu.


After clicking one of these options, the menu appears to manage the collaborators.
The trash can to the far right of the row allows you to remove collaborators from a grievance.
You can also add new collaborators.
Standard View:

Remove:

Add:


*Note: The checkbox to the left of the Collaborator’s name indicates if the Collaborator is Enabled or Disabled. Disabled Collaborators will not receive Grievance responses.
This action is the same as clicking the ‘x’ in the left corner of a Colalborator’s name in the expanded Collaborator menu at the bottom of the Grievance.
‘From’ Email: #
In the past, Grievance App were always sent out using the email address belonging to the Grievance’s Department.
Agents are now able to choose which email address a grievance is sent out from if your system has more than one email configured.

By default, Grievance App are sent out from the email address chosen for the department’s Outgoing Email.
The department’s default address can be modified by going to:
Admin Panel | Agents Tab | Departments | Choose a Department | Outgoing Email

Collaborator Responses: #
An Agent is able to determine that a Collaborator has responded to the grievance by looking at the label next to each message.
Collaborator Response:

User Response:
 *
*
Note: When a User or Collaborator replies to an email, Alerts are NOT sent out to other participants,
while Alerts ARE sent out when a User or Collaborator replies using the Web Portal.
This is simply because the User or Collaborator has the option to reply to all recipients or to reply only to the Grievance App when replying to the email.
View Email Recipients: #
Any time an email is sent out whether it is from the Agent or the User, there is now an option to see who the email was sent out to.
This can be done by clicking the drop down arrow beside a Grievance thread and selecting ‘View Email Recipients’.
User Response:


Agent Response:


Additionally, an Agent is able to see if a response was a Reply All, Reply to User, or reply to no one by looking at the tag in the corner of the Thread Entry.
*Note: When a Grievance is created on behalf of a User, the initial message entered by the Agent will have the appropriate tag as well.

Collaborator Icon: #
When end users log into the system and view the list of Grievance App they have access to, they will now see an icon beside the grievance name if they are a
Collaborator on the grievance. If there is no icon, they are the grievance owner.
![]()
Email Template Variables: #
Grievance Recipients:
Format: %{ticket.recipients} This variable displays a list of visible/active users that are collaborating on a grievance.
Hide Collaborator Grievance App: #
In some instances, Agents may only want their Users to see their own Grievance App if they log into the Web Portal rather than every Grievance they participate in.
We now have a setting to control this.
If the Agent would like to disable Users from seeing their Collaborator Grievance App, they can configure the setting here:
Admin Panel | Grievance App | Settings | Collaborator Grievance App Visibility

By default, Users are able to see all Grievance App they participate in.
View of All Grievance App:

View of only the User’s Grievance App:

Create Grievance or Task from Thread Entry #
Agents now have the ability to create a Grievance or Task from a Grievance’s thread entry or from a Tasks thread entry.
Grievance From Grievance Thread Entry
Original Grievance: #

Opening the New Grievance from the Grievance Thread Entry:

*Notice: The attachment from the original Grievance is carried over into the new Grievance.
New Grievance that was created:

*Notice: An Internal Note is added to the new Grievance referencing the Grievance Number the new Grievance was created from.
Clicking on that reference will open the original Grievance.
Original Grievance After:

*Notice: An Internal Note is added to the original Grievance referencing the new Grievance’s number as well as the Thread Entry the Grievance was created from.
Clicking the Grievance Number will open the new Grievance that was created. Clicking the Thread Entry will scroll the Grievance up to the Thread Entry the new Grievance was created from.
Task From Grievance Thread Entry #
Original Grievance:

Task being created from Grievance:

*Notice: The attachment from the original Grievance is carried over into the new Task.
Original Grievance After:

*Notice: An Internal Note is added to the original Grievance referencing the new Task’s number as well as the Thread Entry the Task was created from.
Clicking the Task Number will open the new Task that was created. Clicking the Thread Entry will scroll the Grievance up to the Thread Entry the new Task was created from.
New Task that was created:

*Notice: An Internal Note is added to the new Task referencing the Grievance Number the new Task was created from.
Clicking on that reference will open the original Grievance.
Grievance From Task Thread Entry #
Original Task:

Opening the New Grievance from the Task Thread Entry:

*
*Notice: The attachment from the original Task is carried over into the new Grievance.
New Grievance that was created:

*
*Notice: An Internal Note is added to the new Grievance referencing the Task Number the new Grievance was created from.
Clicking on that reference will open the original Task.
Original Task After:

*
Notice: An Internal Note is added to the original Task referencing the new Grievance’s number as well as the Thread Entry the Grievance was created from.
Clicking the Grievance Number will open the new Grievance that was created. Clicking the Thread Entry will scroll the Task up to the Thread Entry the new Grievance was created from.
Task From Task Thread Entry #
Original Task:

Opening the New Task from the Task Thread Entry:

*
*Notice: The attachment from the original Task is carried over into the new Task.
Original Task After:

*Notice: An Internal Note is added to the original Task referencing the new Task’s number as well as the Thread Entry the Task was created from.
Clicking the Task Number will open the new Task that was created. Clicking the Thread Entry will scroll the Task up to the Thread Entry the new Task was created from.
New Task that was created:

*Notice: An Internal Note is added to the new Task referencing the Task Number the new Task was created from.
Clicking on that reference will open the original Task.
#
Custom Columns & Custom Queues (Admin) #
What is a Custom Queue? #
A custom queue is a view of Grievance App based on a custom criteria that you specify. It allows you to create your own personal views of Grievance App and specify what information you would like to see.
What is a Custom Column? #
A custom column is an additional field that is not displayed initially when viewing the grievance tab. Using custom columns allows you to include these fields in the grievance list.
Before adding custom columns:

How can I add a global queue that everyone can see? #
Admin Panel | Settings Tab | Grievance App | Queues Tab | Add New Queue

From here, you can configure the new queue by selecting the criteria of Grievance App for the queue:

For this example, I chose to create a queue for the Support Department.
Once the queue is created:

How do I add more columns to a queue? #
Admin Panel | Settings | Grievance App | Queues

From there, you will need to select the queue you want to add columns to. In this example, I will select the Open queue.

Next, you should select the ‘Columns’ tab.

Within the ‘Columns’ tab, you can select fields to be added as columns, edit the order in which fields show up by dragging the rows, and choose which fields should have the option to be sorted.
Additionally, clicking the ‘Config’ button beside a field allows you to:
- Determine how grievance data is displayed
For example, what is shown when hovering over a link or what format dates display as.


Note: Primary and Secondary Data Source refer to the field’s data that will show up in a column. Secondary Data Source allows you to choose an alternative field’s data to display if the Primary Data Source is not populated.
- Add an annotation to show up beside specified fields

An annotation is a small icon that represents more information about a field. For example, the annotation for thread count displays as a chat icon with the number of responses included on a grievance

-
- Add (or modify) conditional styling
Add
 Modify

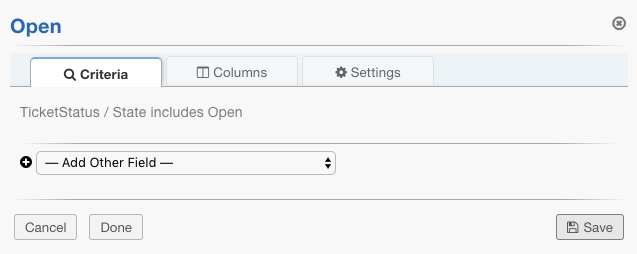
Do custom queues support conditional styling? #
There is a feature to add style to queues. These settings can be found by going to: Admin Panel | Settings | Grievance App | Queues
From there, you will need to select the queue you want to add conditional styling to. In this example, I will select the Open queue
Once you select a queue, you should select the ‘Conditions’ tab where you are able to specify what styling you want and under which criteria. Many options are included to manipulate the color, font style, and text of grievance records.
Before Adding Conditions:

After adding conditions:

Once you save a style, you can click the preview tab to see how it looks.

Adding conditions this way will apply the style to the whole row, as shown above.
If you decide that you want to discard the styling, you can do so by clicking the trash can beside the style.
Additionally, you can add conditional styling to only one field specified. To do this, select the Columns tab within the queue you are adding style to.
Click the ‘Config’ button for the column to add style to it and then select the ‘Conditions’ tab.

In this example, I have chosen to add a background color to Departments with the name ‘Support’
Once saved, Grievance App where the Department is ‘Support’ will have the style added to only the Department column.

How can I customize how Grievance App are sorted in queues? #
Sorting options can be found by going to: Admin Panel | Settings | Grievance App | Queues
From there, you will need to select the queue you want to add column sorting to. In this example, I have selected the Open queue.
There are two ways to control how Grievance App are sorted, and both options can be found from this menu.
- By enabling column sort which will let you sort by a column that is clicked
Selecting the ‘Columns’ tab lets you specify which columns should be sortable by placing a check in the sortable box.
- Specifying the dropdown sort options. These settings can be found by going to:
Selecting the ‘Sort’ tab allows you to specify what sort filters you would like to see in the sort dropdown.

Once saved, you can see your filters by going to Grievance App and clicking on the Sort dropdown

What is the Parent Queue? #
The parent queue is used to determine which column a queue falls under.

In this example, Cloned Queue, Unanswered, Unassigned, and My Grievance App have ‘Open’ as the Parent Queue.

When viewing the ‘Open’ tab, each of these queues are visible.

What are Quick Filters? #
When editing a queue, there is an option to add a Quick Filter. This adds an option at the top of the page to quickly filter by a specified field.

In this example, I will add a quick filter for the Department.

Now, when I view the Open Grievance App queue, I can filter Grievance App by each Department I have access to.

If I click on ‘Sales’, only Grievance App in that Department will be shown.

What does the Default Sorting option do? #
When editing a queue, there is an option to choose the Default Sorting. This automatically chooses which sorting option agents will see by default.
By default, no sort is chosen.

Update sort:
 Once changed:

Custom Columns & Custom Queues (Agent) #
What is a Custom Queue? #
A custom queue is a view of Grievance App based on a custom criteria that you specify. It allows you to create your own personal views of Grievance App and specify what information you would like to see.
What is a Custom Column? #
A custom column is an additional field that is not displayed initially when viewing the grievance tab. Using custom columns allows you to include these fields in the grievance list.
How do I create my own personal queues? #
Each tab has a drop down menu where you can select the option to ‘Add Personal Queue’.
 You are then prompted to specify what criteria of you would like to see in regards to Grievance App in your personal queue:


Once you have saved your changes, the new queue will appear in the list:

Note: Only you can see your personal queues
Where can I edit the personal queues I create? #
To edit your personal queues, simply go to the queue and click the settings button that appears beside the title and choose Edit.

From there, you are able to change the criteria options originally chosen:

How do I add/modify columns to a personal queue? #
Within the same edit menu, select the ‘Columns’ tab:

By default, columns will be inherited from the Parent queue which is ‘Open’ in this case. The parent queue can be changed using the dropdown box indicated with the arrow.

Once the ‘Inherit columns from the parent queue’ box is unchecked, more customizations can be made.
Here, you have the option to rename columns, modify their width, and remove columns. You can also rearrange the columns by dragging them by the double arrows to the far left.

The sortable checkboxes make the column headings clickable. If you click the heading, Grievance App are sorted by that column. In this example, I have clicked the ‘Subject’ column displaying the Grievance App in alphabetical order by the Subject.

Adding Columns To A Personal Queue #
Click ‘Edit’ for your personal queue and go to the ‘Columns’ tab and scroll to the bottom of the window:

Click ‘Add’ and Save the changes.

Now the ‘Due Date’ field can be seen in the Personal Queue.

Adding Quick Filters #
Quick Filters add an option to the top of the page to quickly filter by a specified field. Agents can add Quick Filters to Custom Queues by editing the Queue and going to the Settings tab.


Once saved, an Agent can quickly filter Grievance App by the field of their choice

In addition to being able to create personal queues, Agents can also modify how existing queues show up specifically to them by editing the existing queues.
For example, editing the Open queue:
From here, Agents can customize existing queues in the same way they can customize their own personal queues.
Department CSV Export #
Administrators are now able to download a CSV export of which Agents can access different Departments.
- Go to:
Admin Panel | Agents Tab | Departments

- Select a Department

- Click the ‘Access’ tab
- In the top right corner of the page, there is a download button. Simply click this button to export the CSV.
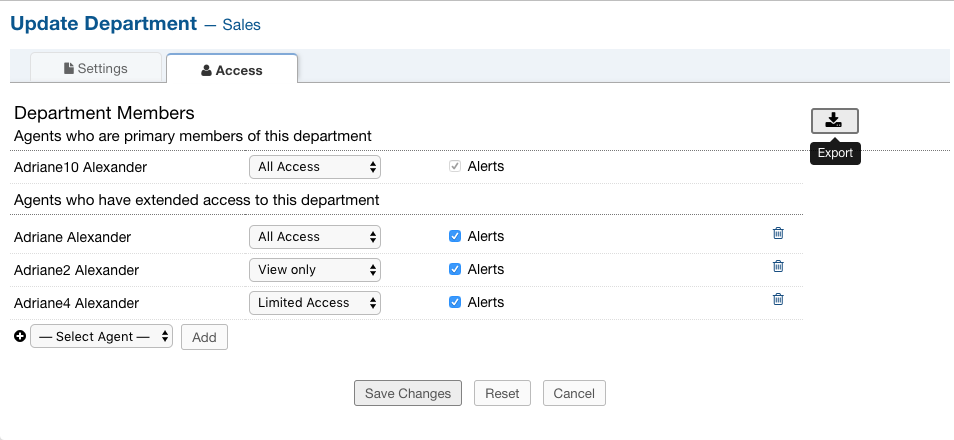
CSV Output: #

*
Note: The access type may be Primary or Extended depending on which type of access an Agent has.
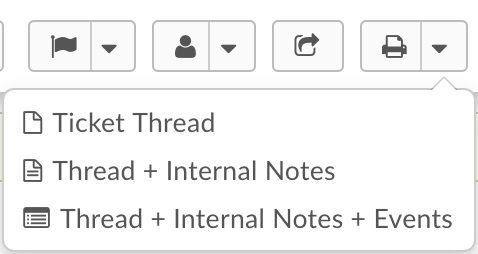
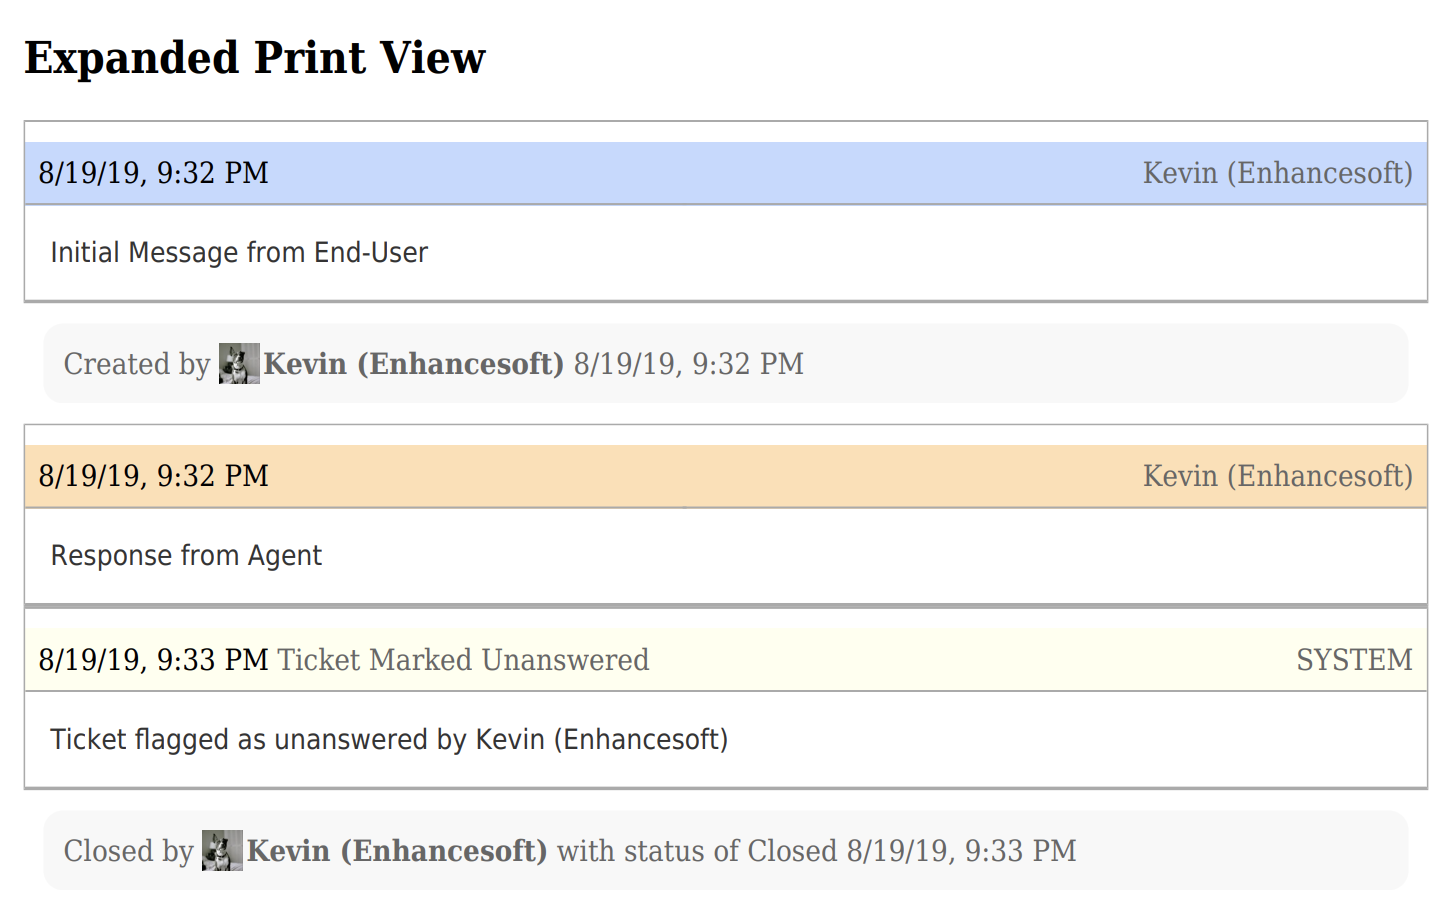
Expanded Print View #
The Expanded Print View feature allows an Agent to print more than just Thread Entries and Internal Notes. It offers the option of printing all of the Grievance’s Thread Events in the PDF. Expanded Print View renders all Thread Events like Grievance changed Status, Field value updated, Grievance Owner changed, etc. This feature requires no special permissions or settings in order to utilize it.
Example Usage #
There are two methods in which you can select the Thread Events option when Printing. The first method is by selecting a checkbox labled Print Events: Print Thread Events in the Grievance Print Options popup.

The second method to print all Thread Events is to select the Thread + Internal Notes + Events option in the Grievance Print dropdown.
Once you either select the checkbox or select the option in the dropdown you should see the Thread Events in your PDF file.
Inline Edit #
With Inline Edit, an Agent can modify an individual field on a grievance without having to edit the entire grievance. Within the grievance header, each field that can be edited inline is selectable (highlighted in blue) and can be changed by simply clicking the field value. Inline editing can be done on a grievance’s standard fields as well as custom fields.
Standard Fields #

Custom Fields #

Once a field value has been clicked, a popup will appear allowing an agent to change the field as well as providing a reason for the update.


Nested Knowledgebase Categories #
Agents now have the ability to further organize their Knowledgebase by nesting categories beneath each other.
Configuration #
First the Administrator should make sure that the Knowledgebase has been enabled.
Go to:
Admin Panel | Settings | Knowledgebase | Enable Knowledge Base

Next, an Agent should create a category.
Creating Categories #
Go to:
Agent Panel | Knowledgebase Tab | Categories | Add New Category

 *
*
Note: The category must be set to Public to be seen in the Client Panel.
*Note: There must be at least one FAQ in a Category for the Knowledgebase to be visible in the Client Panel.
Now that you have an existing Category, you have the option to create a Child category.
Go to:
Agent Panel | Knowledgebase Tab | Categories | Add New Category
This time, choose the existing Categoy to be the Parent Category.

When viewing the Categories tab, Nested Categories are displayed like the following:

The name of the Parent is displayed first followed by the name of the Child, separated by ‘/’.
The final step is to add FAQ’s to the categories.
Creating FAQs #
Go to:
Agent Panel | Knowledgebase Tab | FAQs | Click a Category | Add New FAQs
Adding an FAQ to the Parent Category:

 *
*
Note: The Listing Type must be set to Public to be seen in the Client Panel.
Adding an FAQ to the Child Category:


When viewing the FAQs tab, you see the Child Category listed as a folder beneath the Parent Category and a count of how many FAQs are within each.
 *
*
Note: The Parent Category has 2 FAQ’s: one that was created in the Parent and one that was created in the Child category while the Child Category only has the FAQ that was created specifically for it.
Now that FAQs have been added, Users are able to see the Knowledgebase from the Client Portal:
List of all Categories:

Parent Category:

Child Category:

Release Assignment #
The Release Assignment feature allows Agents to release grievance assignment from other Agents and/or Teams. Agents may only access this feature if they have the new Release Role Permission assigned to them. An important thing to note is Department Managers do not need the Role Permission in order to release assignment of Grievance App within their Department.
Release Role Permission #
To access the Release Assignment feature the Agent’s assigned Role for the Department must have the Release Role Permission enabled. To enable the permission for any Role an Administrator may navigate to Admin Panel > Agents > Roles and click on the name of the desired Role. Under the Permissions tab, check the box next to the Release permission, and Save Changes.

Release Agent & Team #
Upon viewing an assigned grievance a Release (unassign) Grievance option will appear in the More dropdown (Cog-wheel Icon). Clicking this option will introduce a Release Confirmation modal on screen. If a grievance has both an Agent and Team assigned checkboxes will appear next to each name giving the option to choose whom to release assignment from. Checking both boxes will release assignment from both the Agent and Team. Checking one box will release assignment from only the selected Agent/Team.

Release Agent or Team #
If a grievance has only one Agent or Team assigned the modal will simply ask to confirm the release.

Internal Note #
Both modals give Agents the ability to input a reason for releasing the assignment. If a reason is given it is added to the grievance thread as an Internal Note.

Thread Event #
When an Agent releases assignment a Release Thread Event is added to the grievance thread. This thread event shows who released whose assignment and contains a date and time stamp of when the released occurred.

Require Help Topic #
Admins now have the option to require a Help Topic before a Grievance can be closed.
By default, this setting is NOT enabled.
To enable this setting, go to:
Admin Panel | Settings | Grievance App | Require Help Topic to Close

If enabled, Grievance App without a Help Topic will have a warning banner across the bottom of the page, a warning when trying to change the Grievance status to Closed, and a warning flag beside the Help Topic field when editing the Grievance.
Grievance Without Help Topic:

Grievance Warning Banner:

Status Warning Banner:

Edit Warning:

Task Revamp #
The Task Revamp improves upon the current functionality of tasks by adding the following:
- Task due date must be before grievance due date
- Add an Internal Note to the Grievance when a Task is completed
- Send an Alert to the Assigned Agent/Team when task is complete
Task Due Date #
When creating a Task for a Grievance, we now ensure that the Task’s Due Date is before the Grievance’s Due Date
Grievance Due Date:

Task Due Date:

Internal Note #
When a Task that is attached to a Grievance is closed, an Internal Note is attached to the Grievance.
Closing a Task:

Internal Note:

Email Alert #
Additionally, an Email Alert is sent to specified Agents if they are configured.
Email Alert:
 *Note: In order to get the email notification, a different Agent must be closing the Task.
*Note: In order to get the email notification, the proper Alert must be configured.
Since closing the Task creates an Internal Note on the Grievance, you must ensure that you have Alerts set up for Internal Notes.
To check the configuration, go to:
Admin Panel | Grievance App | Alerts & Notices Tab
Make sure the ‘New Internal Activity Alert’ is Enabled and the desired Agents are checked to receive the Alert.

Grievance Merge/Link #
This feature introduces 2 new capabilities in the system: merging and linking Grievance App.
The Grievance Merge feature allows you to combine two or more Grievance App so that their threads will all be in one Grievance. We will call this the Parent Grievance.
Linking allows you to group Grievance App together without actually manipulating any Grievance App. It just gives you a quick way to access Grievance App
that may be related in some way.
Merge and Link Role #
In order for an Agent to be able to merge or link Grievance App, they must be assigned a Role that has permission to do so. In my examples, only the ‘All Access’ Role
has permission to merge or link Grievance App. This can be configured by doing the following:
Go to:
Admin Panel | Agents Tab | Roles | Choose a Role | Click the Merge/Link checkbox

Merging Grievance App #
When Grievance App are merged, all Grievance threads reside on one Parent Grievance. Any responses sent to a Child Grievance will automatically be routed to the Parent Grievance.
If Child Grievance App remain in the system, they will simply be there as a historical record of any fields that were populated on the Child Grievance App.
 On On the Parent Grievance, merged Thread Entries have the merge icon on them, and hovering over the icon will show the Grievance Number of the Child Grievance.
 Both
Both
Both Grievance App have a thread event indicating that the Grievance App were merged.
There are 2 ways to merge Grievance App:
1. From within a Grievance
2. From the Grievance App queue
Merging from within a Grievance #
The ‘Merge Grievance App’ option can be found by going to the More dropdown.

Once clicked, the Agent will see the Parent Grievance, which is the Grievance they are currently in, as well as the options available when merging Grievance App.

The first Grievance Number displayed in the list is the Parent Grievance. Moving a different Grievance to the top of the list will change the Parent to that Grievance.
Once a Grievance has been made a Parent, other Grievance App can be merged to the Parent, however, the Parent Grievance can NOT be merged to any additional Grievance App.

Merge Options #
There are several different options that can be chosen when merging Grievance App. We will outline the following below:
– Participants
– Merge Type
– Delete Child Grievance
– Move Child Tasks to Parent
Participants #
The Participants dropdown allows you to choose how participants of child Grievance App will carry over to the Parent Grievance. By default, this is set to ‘User + Collaborators’.
This means that participants of the child Grievance will be added as Collaborators to the Parent Grievance if they are not already participants of the Parent Grievance.
If the ‘User’ option is chosen, the User of Child Grievance App will be added as Collaborators to the Parent Grievance if they are not already the User or a Collaborator on the Parent Grievance.
Merge Type #
There are 2 types of Merges:
1. Combine Threads
2. Separate Threads
Combine Threads: Threads from all Grievance App will be displayed chronologically.
 Separate Threads: Threads from Grievance App will be displayed one Grievance at a time.

Delete Child Grievance #
Checking this box will result in Child Grievance App being deleted upon merging. Data from the Child Grievance App is no longer in the system, so the Parent Grievance will not
be displayed as a merge, but rather a regular Grievance. It will still have a thread event stating that another Grievance was merged into it, and each child thread entry
will have the merge indicator icon beside it.


*Note: If there were any Tasks on a Child Grievance where the ‘Delete Child Grievance’ option was checked, those tasks would be moved to the Parent Grievance.
Grievance With Task Before Merging:
 Grievance Without Task Before Merging:
 Merge Grievance App:

Move Child Tasks to Parent #
If you are merging Grievance App without deleting the child Grievance App, there is also an option to manually move child Tasks to the parent Grievance.
Grievance With Task Before Merging:
 Grievance Without Task Before Merging:
 Merge Grievance App:

Parent Grievance After Merging:
 Child Child Grievance After Merging:
 Parent Grievance After Merging:

Adding Grievance App to be Merged #
In order to merge in another Grievance, the Agent simply types the Grievance Number into the ‘Select Grievance’ box, select the desired Grievance, click Add a Grievance, and then Save Changes.


Merging from the Grievance App Queue #
*Note: The Merge button will be displayed as long as the Agent has the Merge Role permission for at least one Department they have access to; they can only
merge Grievance App within the departments they have the Role permission to do so. If you do not have permission to merge Grievance App from a Department, you will see the following error message.

If an Agent has a Role with permissions to merge Grievance App, they can do so from the Grievance App queue for Grievance App of that Department. This can be done by using the check
boxes to select Grievance App to merge and then clicking the ‘Merge’ button at the top right of the screen.


Once selected, the Agent can drag the Grievance they would like to be the Parent Grievance to the top of the list and then Save Changes to merge the Grievance App.


*Note: For merges, Children Grievance App do not show up in the main Grievance queue, however, Agents can still search for them. In this example, Grievance #265518 is the
Parent Grievance and Grievance #516834 is the Child Grievance.
Hovering over the merge icon will allow Agents to see the type of merge that was done.
Grievance Permissions
Grievance Permissions for merged Grievance App are based upon an Agent’s access to the Parent Grievance’s Department. If Grievance App with different Departments are being merged,
the Parent Grievance will automatically be referred to the Child Grievance’s Department so that the Agent will have access to both the Parent and Child Grievance. To read
more about Grievance Referrals, go here.
Grievance App in different Departments:


Linking Grievance App #
Linking Grievance App is similar to merging Grievance App, however, linking Grievance App does not actually combine thread entries. Linking Grievance App simply adds a link to related
Grievance App. The Grievance App behave exactly as they did before with replies going to their respective Grievance App. Linking can be done within a Grievance or from the Grievance queue.
Linking from within a Grievance #
The ‘Link Grievance App’ option can be found by going to the More dropdown.

Once clicked, the Agent will see the Parent Grievance, which is the Grievance they are currently in, as well as the options available when linking Grievance App.

Notice that for linking Grievance App, Agents only have the option to add Grievance App since thread entries are not affected when linking Grievance App. All Grievance data remains the same when linking.


Linking from the Grievance App Queue #
Linking from the Grievance App queue is done the same was as merging from the Grievance App queue. Simply select the Grievance App to link and then click the Link icon.

Remember, the Grievance on top will be the Parent Grievance. For this example, I want to use Test Grievance 3 as the Parent since it is already the Parent of Test Grievance 4.

Now when I go back to the Parent Grievance, I can see all of its children listed in the Grievance.


If I click the ‘Link Grievance App’ option from this Parent Grievance, I am given the option to unlink Grievance App as well as switch the Parent Grievance.

Unlink Grievance App #
To unlink a Grievance, simply click the garbage can icon beside the Grievance App you want to unlink and save your changes.


Switching Link Parents #
Since linking Grievance App does not change anything about any Grievance involved, you may change which Grievance is the Parent. Within the Grievance, go to the ‘Link Grievance App’ option.


This shows you all of the linked Grievance App. The Parent Grievance is on top of the list. To change the Parent, simply drag a different Grievance to the top of the list and Save Changes.

Now, Test Grievance 6 is the Parent Grievance.

Merged/Linked Grievance Indicators #
There are several ways to know if a Grievance has been merged or linked. There are optional configurations that can be set up on queues. Additionally, visiting a Grievance
that is part of a merge or link will have indicators.
Merged/Linked Grievance App in the Queue #
An annotation can be added to a column in a queue to indicate that a Grievance has been merged or linked. To do this globally, go to:
Admin Panel | Settings | Grievance App | Queues | Select a Queue
 Next, go to the Columns tab and click the ‘Config’ button next to the column that should show the merged icon.

Go to the ‘Annotations’ tab and select ‘Merged Icon’. Choose where you would like the icon to be visible. In my example, I will show the icon at the end of the
Grievance Number column.

Once the changes have been saved, the Merged/Linked Icon shows up, depending on which has been done for Grievance App.

You can also add a column to indicate if a Grievance has been merged or linked.
Go to:
Admin Panel | Settings | Grievance App | Queues | Choose a Queue | Columns Tab


 Repeat the same steps for the Linked column.
 Once saved, the queue will show the new Merged and Linked columns.

Viewing Merged Grievance App #


Both Parent and Child Grievance App have a ‘Related Grievance App’ tab to help easily navigate between the related Grievance App.
 Hovering over the Grievance Number will show a preview of the related Grievance.

Merged thread entries have the merged symbol in the top right corner that displays the Child Grievance # when hovered over.

Searching for Merged Grievance App #
As mentioned earlier, Child Grievance App for merges are not displayed in the Grievance queue, however, they do appear in search results. You can easily do a search for all
Merged Grievance App by searching where Merged is checked:


Searching for Linked Grievance App #
Linked Grievance App can also be easily found by searching for where Linked is checked.


Merge/Link Icon Information #
When choosing Grievance App to merge/link, the Grievance rows contain helpful information about the Grievance App chosen. The columns shown from left to right include:
– Grievance Number
– Grievance User
– Subject
– Thread Entry Count
– Task Count
– Merge Preview
– Link Preview
– Collaborator Preview

Note: If a Grievance does not have some of the data listed, for example, tasks, a space is left where that icon would be.
Each blue item in the row shows additional information when hovered over.
Grievance Referral #
The grievance referral feature allows for the ability to refer Grievance App (& any associated tasks) to an Agent, Team or Department who otherwise do not have access. Referrals can also be used to retain view only access to the grievance once referred rather than losing access to the grievance.
The referred party only has view Role for the thread with the ability to post internal notes. It’s important to note the grievance will technically still be the responsibility of the primary department and/or assignee. Transferring or assigning a grievance and unchecking the “maintain referral access” box in the pop-up is how an agent can relinquish the responsibility.
The permission to refer a grievance is tied to the Agent’s role permission for Grievance App of the department and included within the ability to transfer and/or assign Grievance App.
Agent & Team Referral #
Referring a grievance to an Agent or a Team is just like assignment without actually assigning. The referee will only have a view Role and current assignees retain the responsibility of the grievance.

Department Referral #
Department referral, unlike grievance transfer, is like assigning a grievance to the entire department. Meaning agents who have access to the referred department will be able see the grievance. What they can do with the grievance will depend on the their individual assigned role in the grievance’s department, otherwise they’ll have a “view only” Role.

Managing Referrals #
To Manage Referrals an Agent must have the Refer permission enabled in the Role for the Department they are referring from.

Grievance referrals can also be done independent of grievance transfer or assignments. This includes the ability to add new or remove prior referrals.
