
Dashboard #

Meant to be a historical marker of the metadata in your Grievance App, the Dashboard will give you an overview of grievances in your Grievance App. The data can be filtered by date as well as Departments, Help Topics, and Agents. This data can also be exported into a CSV file.
Opened
Grievances that were originally opened having the Department or Help Topic on the grievance. When a grievance is created, one item will be added to Opened. For the Agents tab, the Opened column reports how many grievances an agent has manually opened on behalf of a User.
Assigned
Grievances that have been assigned to either an Agent or a Team while also being in the Department or Help Topic listed in the column, or grievances that were assigned to the Agent listed in the column, within the timeframe chosen. The number reflects grievances that are manually assigned to agents or teams, claimed grievances, grievances assigned from grievance filters, grievances assigned based on help topics, and grievances assigned based on user organizations. The number does not reflect grievances where an agent is automatically assigned to a grievance that they they have responded to. Note that if the grievance was assigned to a Team, the report numbers for Agents will not change, even if they are in the team selected.Grievances can be auto-assigned to certain departments and/or agent based on your set up of emails and filters. Grievances can also be assigned internally to other agent/departments. The system tracks each time the grievance is assigned. The colored circles signify the same as above.
Overdue
Grievances that have been marked ‘Overdue’ by the system while having the Department, Help Topic, or Agent on the grievance as well, within the timeframe chosen. Grievances are marked Overdue when they have violated the SLA Plan to which they belonged, causing them to have a status of ‘Open’ past their Due Date
Closed
The number of Grievances in the Department that are currently in the Closed status while having the Department, Help Topic, or Agent on that grievance, within the timeframe chosen. If the grievance is reopened, the number of closed grievances decreases by 1 and the number of Reopened grievances for the department increases by 1.
Grievances can be closed three ways:
- Go to the grievance listing page, highlight the selected grievance by checking the box on the far left side of the screen. Once the grievance(s) are selected, scroll to the bottom of the page and click on the “close” button in the middle. A pop-up box will appear to ask about closing the selected grievances. Press “Yes” to continue to close the grievances.
- A grievance can be closed when clicking on the grievance to view the contents of the grievance- this will not send a notification to the sender. At the top right of the grievance screen, there will be buttons including “close”. When pressed, a dialogue box will pop-up asking for internal documentation of why the grievance is being closed. Although not required to close the grievance, it is highly recommended.
- A grievance can also be closed under the “Post Internal Note” tab at the bottom of a grievance. In order to close a grievance in this manner, you must include an internal note then change the “GrievanceStatus” for that grievance to “closed.”
Reopened
The total number of times a grievance was Reopened while having the Department, Help Topic, or Agent listed for the grievance within the timeframe chosen. If a Closed Grievance’s status is changed from Closed to Open, an item is added to Reopened and removed from Closed.
Grievances can be reopened in two ways:
- A customer can respond to a grievance that agent has closed internally.
- Select and click on a “closed” grievance> (scroll to the bottom of the grievance ) > Post Internal Note > Change Grievancestatus.
Deleted
The amount of grievances that have been deleted while having the Department, Help Topic, or Agent listed for the grievance within the timeframe chosen.
Service and Response Time calculate the values for the Departments, Help Topics, or Agents based on what is currently on a grievance. These values are calculated in hours with decimals representing minutes. In order to convert the decimals to minutes, you should multiply the decimal by sixty.
Service Time
Refers to the duration of time that begins at the opening of a grievance and ends when the grievance is closed without being reopened again. The Service Time column measures the average Service Time per grievance, in hours, within the specified date span.
Response Time
Shows an average of the number of hours between when a user posted a message on a grievance and when an agent responded/replied to the customer.
Agent Directory #

This is where to find all of the information about every Agent in the Grievance App.
My Profile #

Account #
General
Name: Agent’s First and Last name.
Email Address: Agent’s email address.
Phone Number: Phone number for Agent.
Extension: Phone number extension (if applicable)
Mobile Number: Agent’s Mobile phone number.
Authentication
Username: Agent’s username.
Status & Settings
Show assigned grievances on open queue: Shows assigned grievances on open queue.
Vacation Mode: Agent will not receive grievance notifications or emails until disabled.
Preferences #
Profile Preferences & Settings
Maximum Page Size: Maximum number of grievances per page.
Auto Refresh Rate: Grievances page refresh rate in minutes.
Default From Name: From name to use when replying to a thread.
Thread View Order: The order of thread entries.
Default Signature: Default signature used when replying to a thread.
Default Paper Size: Paper size used when printing grievances to PDF.
Reply Redirect: This setting defines where the system will redirect you after posting a Reply on a grievance. There are two options, Queue and Grievance. If set to Queue the system will redirect you to the previous GrievanceQueue you were viewing. If set to Grievancethe system will redirect you back to the same grievance you posted a Reply on so you may continue working on it. The default value for this setting is Grievance.
Image Attachment View: Open image attachments in a new tab within your browser with Inline or directly download the attachment with the Download setting (CTRL + Right Click).
Editor Spacing: Set the editor spacing to Single or Double when pressing Enter.
Localization
Time Zone: The time zone for Agent.
Time Format: Time format preferred.
Preferred Locale: Language preference.
Signature
The signature for the Agent.
User Directory #

Users can now create an account and log-in to create a grievance or check a grievance’s status. As always with Grievance App, users or grievance creators are associated with their email address as the unique identifier of each user. The User Directory, located on the Agent Panel, allows agents to search grievances by user as well as create Organizations to associate the user to. Agents can be configured as internal Account Managers for grievances created by users of an Organization.
What is a User? #
Users are the grievance owners of the grievances in the Grievance App. When a grievance is created in the Grievance App, the user is associated with their email address in the User Directory of the Grievance App. Users can be added or deleted from the User Directory of the Grievance App at any time. Please note, if the user is deleted the grievances of the user must also be deleted.
Add New Users #
You can add users to the User Directory of the Agent Panel of the Grievance App either individually or by importing them by uploading a CSV file. If you are uploading, you will need to match the headers of the CSV to the fields in the Contact Information built-in form. Once you add the user, you can associate the User to an Organization of the Grievance App.
User Import via Copy/Paste #
Importing a list via copy/paste allows you to easily import User’s names and email addresses from a simple list.
Create a list of names and email addresses on any text editor. Separate each name and address by comma, making a new line for each User.

Copy the list, then go to the User Directory and select import.


Paste list then select ‘Import Users’.

User import via CSV file #
Importing Users via CSV file allows you to import User’s names and email addresses as well as additional details if necessary.
Go to the User Directory and select ‘Import’ then ‘Upload’.
Take note of the Column Headers listed here as your spreadsheet headers will need to match. You can customize these headers as well as add additional fields to import by editing the Contact Information form located at Admin Panel > Manage Tab > Forms.
Create a spreadsheet of names and addresses, as well as any other fields that you would like to import, matching the column headers to the ones shown in Grievance App.

Once the spreadsheet is complete, export the document into a CSV file and import the file into osGrievanceat Agent Panel > Users > Import > Upload Tab.

Guest User vs Registered User #
You can choose to have your users register prior to submitting a grievance to your Grievance App from your Client Portal from Agent Panel > Users > User Directory > More > Regis. If a User is registered, this means they have created an account and verified their email. Once registered, they will be able to access all grievances they have in the Grievance App. Users can create their own User account or they can be added from the Agent Panel of the Grievance App. If added internally, the Agent will need to send the registration email for the User to verify their email address prior to becoming a registered user. Guest Users don’t require registration to submit grievances.
Managing Registered Users #
Once a user has activated their account with the Grievance App, Agents can administratively manage their access to the Grievance App; including requiring a password reset, locking them from the Grievance App, and even resetting their password. The User management feature is accessible by opening the configurations of that user and clicking the Manage Account quick button at the top right of the header.

A pop up box will appear; click on the Manage Access tab to configure these features.

Reset a User’s password #
If necessary, administrators can manually reset a User’s password by going to their User Profile in the User Directory, then selecting the Manage Access Tab. Once manually set, an Agent will need to communicate the new password to the User allowing them to log-in; the User can be forced to reset the password upon logging in by keeping the box checked at the bottom left of the pop-up.
Organizations #

Organizations can be created to add/associate users in the Grievance App to the organization. Within the Organization Directory, the settings can be edited to add agents as Account Managers of the Organization which will allow them to be auto-assigned to all grievances created by users of that organization.
Primary Contacts can be selected from the Organization’s users to enable them to be added as collaborators for all grievances created in association with the users of the organization.Users can also be select to auto-add all users from the organization to each grievance created by a user of the organization. The same rules apply for sharing grievances of the users of the organization.
Organizations are located in the User Directory of the Agent Panel. Each grievance created in the Grievance App is associated to a user via their unique email address. Organizations allow a way to manage users and associate them with one Organization in the Grievance App. Organizations can reflect companies, clients, departments or any group that users can belong to in the Grievance App. This is useful in determining grievances by organization as well as users of the organization.
Users can be added to an organization by the specific user’s profile by clicking “Add Organization” on the header.

A pop-up box will appear allowing the organization can be searched from the top toolbar of the pop up or created if it does not currently exist.

If the user is not currently in the user directory, they can be imported from the organizations’ tab; these users would automatically be added to the organization they are imported into. Once the Users are in the Organization, specific users of the organization can be delegated as primary contacts and selected to be auto-collaborated to all grievance open by users of that organization. If configured, these users will be added to any grievance created by users of that organization allowing them access to view these grievances from the client portal.
These settings can be found by clicking on the Organization name with the square and pencil next to it.

When you click on the organization name to configure the settings, a pop-up box will appear; go to the Settings tab of the pop-up.

Settings of the organization include the ability to assign an Agent or Team as the Account Manager of the Organization. By being the Account Manager, these agents can receive specific Alerts and Notices during different events in the grievance’s life cycle for grievances created by users assigned to the Organization. Grievances of this organization and every user assigned to the Organization can be auto-assigned to the Account Manager selected.
Primary contacts are users of the Organization which can be auto-collaborated to all grievances of the organization. All members of the organization can also be added as collaborators to all grievances of the Organization if necessary.
To auto-add members to the organization based on the domain or subdomain of their email, add the email domain to the last section of the Organization settings. More than one email domain can be entered per organization by comma separating the email domains.
Fields of the Organization can be managed by going to the Admin Panel > Manage > Forms > Built in Forms > Organization Information. Fields added here will be collected on all Organizations when created or edited. Custom forms can be added to an individual Organization from the “More” quick button on the right top side of the table when in an Organization configurations page.
Tasks #

Considered an internal to-do list of sorts, tasks are only visible to Agents of the Grievance App with access to the Department the task is assigned to. Tasks can be associated with Grievances of the Grievance App or created and assigned independent of Grievances.
If a task is created in association with a grievance, the grievance can not be closed until all tasks are marked as complete. Tasks can be created in association with a grievance from the top of the Grievancethread; directly below the grievance header. An unlimited number of tasks can be created for the grievance and assigned to any department or agent of the Grievance App. Note: if the agent assigned to a task associated with a grievance does not have Department Access to the grievance’s department, they will not see the thread of the grievance; only the grievance meta data and the task to which they are assigned.
Tasks that are dependent on a grievance as well as those independent of a grievance will appear in an agent’s Task tab of the Agent Panel. Only those tasks assigned to the Department(s) the agent has access to will show in the agent’s task tab. If the task is associated with a grievance, the task header will contain a linked reference to the grievance for the agent.
Fields required to create a task include the Task Summary, Task Detail, and the Department to which the task is assigned. Other optional fields when creating a task include the Assigned Agent or Due Date. Fields of the Task Form can be expanded in the Admin Panel > Manage > Forms > Task Details built-in form.
There are messages which can be enabled to alert agents of the events in a Task’s lifecycle. These messages can be enabled in the Admin Panel > Settings > Tasks and include:
New Task Alert: Alert sent out to Agents when a new task is created.
New Activity Alert: Alert sent out to Agents when a new message is appended to an existing task.
Task Assignment Alert: Alert sent out to Agents on task assignment.
Task Transfer Alert: Alert sent out to Agents on task transfer between Departments.
Overdue Task Alert: Alert sent out to Agents when a task becomes overdue based on SLA or Due Date.
Third Party Collaborators can be added to Tasks by agents to receive updates on the tasks as posted by the Agents of the Grievance App. Collaborators will not have access to nor see the task when they login to the Client Portal; they will simply receive a New Activity Notice with the updates posted. If the Collaborator responds to the Notice, this will thread back into the task in the Grievance App.
Advanced Search #
Several improvements have been made to the Advanced Search to make it more user friendly and more efficient
Old Advanced Search:
Grievances #
When an agent logs in to the Grievance App, they will be automatically routed to the Open GrievanceQueue.

These are grievances the Agent has access to based on their Department and Group assignments as well as grievances that are assigned directly to them or a team they are included.
Grievances are sorted first by the Priority Level and second by the Date- which is the date of last update. Each column of the queue is sortable but the default will return to the Priority/Date sorting each time they log-in.
There are 5 Queues along the sub-tab including:
Open: these are grievances Open in the Grievance App including both New Grievances and grievances that the end user is the last respondent on. These will have a BOLD grievance number to give the visual
Answered: These are grievances that have been responded to by Agents and are awaiting response back from the grievance owner. This queue can be collapsed into the Open grievance queue. Grievances that have been answered will not have a bold grievance number to visually represent the last action was by the Agent.
My Grievances: These are grievance that are assigned directly to the Agent or a team the Agent is assigned.
Overdue: These grievances have exceeded the assigned SLA Plan or Due Date assigned to the grievance. SLA Plans can be determined by the Department, Help Topic or GrievanceFilter configuration. Due Dates are manually assigned to grievances when an Agent creates a grievance from the client portal or when they edit an existing grievance.
Closed: Grievances in this queue have been marked closed by the Agent either upon response to the end user or from the quick button of the grievance queue. Grievances that are marked closed can be reopened on response by the end user.
Grievances in these queues are not unique to each queue meaning that there may be some overlaps- For example, a grievance can be Answered and Overdue at the same time and therefore, will appear in both grievance queues.
Agents can preview the metadata of the grievance by hovering over the grievance number. A pop-up box will appear allowing the Agent access to actions along the bottom of the pop-up as well as access to the collaborators of the grievance.

Agents can open up the grievance by clicking on the GrievanceNumber or the Subject of the grievance. When an agent opens the grievance, the default will be to direct them to the Reply box at the bottom of the grievance.

Based on their Role permissions, Agents can reply back to the end user by typing their response into the box- including adding attachments, links and embedding YouTube videos. Agents can select a canned response from the drop down in the reply box even if typing some of the response. All canned responses can also be edited by the Agents in the reply box prior to being sent. Collaborators can be added here to have access to the grievance. If necessary, the status of the grievance can be changed from the drop down prior to posting the response.
If a response is required yet the Agent does not want to send the response to the user but still post the response to the grievance thread, they can select the “Do Not Email Reply” from the drop down above the reply box for the user. This will also not send email replies to any collaborators on the grievance.

This response will be in the thread and visible to the grievance owner and any collaborators when they check the status of the grievance from the Client Portal of the Grievance App.
Grievance Header #
From the top of the grievance or the GrievanceHeader, Agents will see any data associated with the grievance from the built in GrievanceDetails form as well as any custom form associated with the Help Topic.

From the quick action buttons on the top right of the GrievanceHeader, Agents can perform a few different actions if granted these permissions in their assigned Group.
Print: Allows Agents to print a specific Grievanceor download it as a PDF. PDF Files will have File Icons and ZIP Archives will have Folder Icons.
GrievanceThread: Prints the entire GrievanceThread (excluding Internal Notes and Thread Events).
Thread + Internal Notes: Prints the entire GrievanceThread including Internal Notes (excluding Thread Events).
Thread + Internal Notes + Events: Prints the entire GrievanceThread including Internal Notes and Thread Events.
Thread + Internal Notes + Attachments: Prints the entire GrievanceThread including Internal Notes and Attachments.
Thread + Internal Notes + Attachments + Tasks: Prints the entire GrievanceThread including Internal Notes, Attachments and Tasks.
Edit: This action allows agents to edit the fields of the grievance- including any custom forms that are added to the grievance once it is created.
Change Status: Agents can change the status of the grievance with no response required. If changed, a pop up box will appear allowing agents to include notes with the status change.
More: Depending on the Agent’s Role permissions, they can see these functions.

Change Owner: this allows the Agent to change the owner of the grievance. If the owner is changed, the previous owner will no longer have access to the grievance.
Merge Grievances: Merging allows you to combine two or more Grievances so that their threads will all be in one Grievance; We will call this the Parent Grievance.
Link Grievances: Linking allows you to group grievances together without actually manipulating any Grievances; It gives you a quick way to access Grievances that may be related in some way.
Release (unassign) Grievance: Release allows Agents to release grievance assignments from other Agents and/or Teams. Agents may only access this feature if they have the new Release Role Permission assigned to them. Note: Department Managers do not need the Role Permission in order to release assignment of grievances within their Department.
Mark as Answered/Unanswered: This allows the Agent to mark the grievance as Answered or Unanswered (depending on it’s current state). The Agent has to have the Post Reply permission for the Grievance’s Department in order to utilize this feature. When marking a grievance as Answered/Unanswered the Agent gets a popup to optionally put a reason why they marked it as such. If a reason is provided it will be added as an Internal Note with the title GrievanceMarked (Un)Answered (depending on what it was marked as). Regardless of if they put a reason or not the system will always put a SYSTEM Note saying the grievance was flagged as (Un)Answered by the Agent along with a timestamp.
Manage Forms: This will allow the agent to attach any Custom Forms of the Grievance App to the grievance. Fields of the form can be edited once added by clicking on the “Edit” quick button. The fields of the form will not show up on the grievance header until there is information in the fields. If enabled, either the Agent or the grievance owner can edit the fields of the added forms.
Forms currently on the grievance can be removed from the Manage Form quick button. Any data in the form fields will also be deleted.
Ban Email: A email address can be ban from created grievances in the Grievance App by added them to the ban list. This action can be undone by the Grievance App administrator if necessary. Banning an email address will not delete grievances of that user; this action will have to be done separately if necessary.
Delete Grievance: When selected, a pop-up box will appear allowing the agent to give an optional reason for deletion. Once a grievance is deleted, it is not recoverable! If the agent types a reason in the pop-up box, that note will appear in the System Logs for the Administrator.
User Information on the Grievance Header
Information about the grievance owner can also be edited from the grievance header.

The number in parenthesis next to the User’s name is the number of grievances they currently have in your Grievance App. If you click on the number – this will allow the agent a few options:

They will be able to view grievances of this user that are either Open or Closed in the Grievance App or the option of viewing both by clicking All Grievances.
If they click “Manage User” this will redirect them to the User’s profile in the User Directory. Same for if they click “Manage Organization”
If you click on the user’s name a pop up box will appear allowing you to edit their information as well as change the grievance owner of this grievance.
Any actions taken on the User or Collaborators as well as with in the grievance will be noted as an internal note in the Grievance Thread.

To edit the fields of the Contact Information form for the user, click on the icon that is the pencil in the box located in the middle right of the pop-up box.
GrievanceT hread #
Each message of the grievance thread is color coded to give the agents a visual representation of what the thread entry is and/or who performed the action.
Replies from the GrievanceOwner or a Collaborator will appear with a Blue banner in the GrievanceThread:

Internal notes will appear with a light Yellow banner. They will also contain any actions taken within the Grievance(transfer, assignment, etc)

Agent’s response back to the Grievance Owner or Collaborator will appear with an Orange Banner:

Any items in the GrievanceThread that are with the Blue or Orange banner are also visible to the GrievanceOwner as well as any collaborators on the grievance when they check the grievance status from the Client Portal of the Grievance App.
Personal queues #
What is a Custom Queue? #
A custom queue is a view of grievances based on a custom criteria that you specify. It allows you to create your own personal views of grievances and specify what information you would like to see.
What is a Custom Column? #
A custom column is an additional field that is not displayed initially when viewing the grievance tab. Using custom columns allows you to include these fields in the grievance list.
How do I create my own personal queues? #
Each tab has a drop down menu where you can select the option to ‘Add Personal Queue’.

You are then prompted to specify what criteria of you would like to see in regards to grievances in your personal queue:


Once you have saved your changes, the new queue will appear in the list:

Note: Only you can see your personal queues
Where can I edit the personal queues I create? #
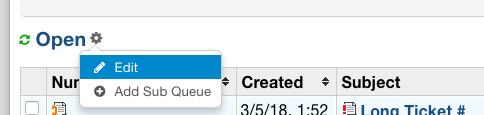
To edit your personal queues, simply go to the queue and click the settings button that appears beside the title and choose Edit.

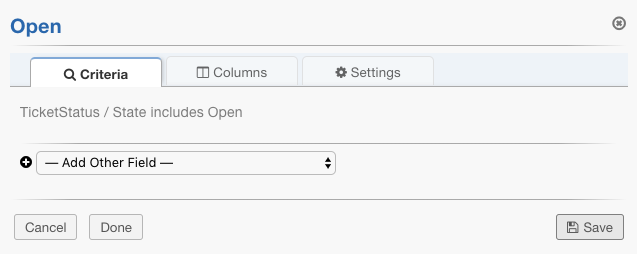
From there, you are able to change the criteria options originally chosen:

How do I add/modify columns to a personal queue? #
Within the same edit menu, select the ‘Columns’ tab:

By default, columns will be inherited from the Parent queue which is ‘Open’ in this case. The parent queue can be changed using the dropdown box indicated with the arrow.

Once the ‘Inherit columns from the parent queue’ box is unchecked, more customizations can be made.
Here, you have the option to rename columns, modify their width, and remove columns. You can also rearrange the columns by dragging them by the double arrows to the far left.

The sortable checkboxes make the column headings clickable. If you click the heading, grievances are sorted by that column. In this example, I have clicked the ‘Subject’ column displaying the grievances in alphabetical order by the Subject.
Adding Columns To A Personal Queue #
Click ‘Edit’ for your personal queue and go to the ‘Columns’ tab and scroll to the bottom of the window:

Click ‘Add’ and Save the changes.

Now the ‘Due Date’ field can be seen in the Personal Queue.

#
Adding Quick Filters #
Quick Filters add an option to the top of the page to quickly filter by a specified field. Agents can add Quick Filters to Custom Queues by editing the Queue and going to the Settings tab.


Once saved, an Agent can quickly filter grievances by the field of their choice

In addition to being able to create personal queues, Agents can also modify how existing queues show up specifically to them by editing the existing queues.
For example, editing the Open queue:
From here, Agents can customize existing queues in the same way they can customize their own personal queues.
Knowledgebase #

Add Canned Response #
To create a canned response for quick answers to common questions or a specific phrasing of a response for agents, go to Agent Panel > Knowledgebase > Canned Response.
Canned responses can be open to all departments or limited to only one department. (The department availability is determined by the department the grievance is assigned to, not the agent.) Simply choose the department from the drop down above the text area when creating the canned response.
Also available with canned responses is the availability of the HTML/Rich Text toolbar. This enables the addition of pictures, graphs and links to the response. Emphasis can be placed on specific words or phrases with the tool bar.
Variables can be added to the body of the responses to allow the data of the correlating fields to be pulled automatically in place of the variable. If there is no information in the field, the space will be left blank where the variable is located.
Attachments can also be added to Canned Responses which will attach to the response/grievance when populated. Attachments can be removed prior to sending the response if necessary.
Add FAQ to Category of the Knowledge Base #
An unlimited number of FAQ’s can be added to the Knowledge Base. These FAQs can be marked as private if it is for internal view only or public if it is to be visible on the Client Portal of the Grievance App. Please note, if it is to be visible for public use, both the Category and the FAQ must be marked Public.
First, the Knowledge Base will need to be enabled for the client interface by going to Admin Panel > Settings > Knowledgebase.

Once enabled, the Knowledge Base can be built by agents in the Agent Panel > Knowledge Base. To built the knowledge base, the agent will have to first, Add a Category and then add Frequently Asked Questions to the Category. Within the Category you have the ability to nest Categories together. Nested Categories are listed together within the Knowledgebase.
To add FAQ’s to the Category, the agent will need to click on the Category name on the FAQ tab:

Then click on Add a New FAQ:

FAQs can have attachments, HTML/RIch Text and also be associated with specific Help Topics of the Grievance App. This is useful when the clients are searching through the Knowledge Base from the Client Portal; they can select the Help Topic and then only see the FAQs that have been associated with that topic.