
System Logs #
Admin Panel > Dashboard > System Logs
The System Logs section of the Dashboard Tab is where you will find any troubleshooting-related logging activity (e.g., Errors, Warnings, or Bugs). As seen below, this can relate to various issues, and when the cursor is above any Log, the specific details of the Log are shown.
To delete any Log entries, simply mark the checkbox next to the Log and press the ‘Delete Selected Entries’ button at the top right.
Also, the Default Log Level (e.g., Error, Warn, Debug, or None) can be selected from the Admin Panel > Settings > System tab.

Information #
This section of the Admin Panel describes the system that Grievance App App is installed on. This section displays the system’s Server Information, PHP Extensions, PHP Settings (which have to do with the php.ini file), Database Information and Usage, and Installed Language Packs associated with Grievance App App.
Basically, this page provides all the technical information of the server and the installed packages necessary to the installation and/or quality performance of Grievance App App. This page is also very useful for determining how to best troubleshoot any problems or concerns by detailing the system version numbers.

Company Settings #
Basic Information #

This tab contains the information that will be pulled into the email templates for the Grievance App App company information, including Company Name, address, etc. Custom Fields can be added to the Company Information built-in form located at Admin Panel > Manage > Forms.
Site Pages #

This is where you choose the layout your User will see for common pages.
Landing Page: Displayed on the front page of your website.
Offline Page: Displayed when your Grievance App Appis offline.
Default Thank-You Page: Displayed to the User when they submit a new grievance.
Logos #

The Grievance App App can be branded with a company logo by uploading a company logo at Admin Panel > Settings > Company.
The logo may be an image in a .gif, .jpg, or .png format. To speed up load times, it is recommended that the image be sized close to the default image size (817px x 170px). Once the logo has been selected, click on “Save Changes” at the bottom of the page to start the upload process.
After the logo is uploaded, be sure to select it to be visible on the Landing, Thank You, and Offline pages. Numerous logos can be uploaded and added to email templates; however, only one logo can be visible at a time on all Site Pages.To edit the text for these pages, simply go to Admin Panel > Manage > Site Pages and select the page to be edited.
Login-Backdrop #
Upload an image to customize the Backdrop that will be displayed on the staff login page. Choose an image in the .gif, .jpg, or .png formats. We will proportionally resize the display of your image. We will not, however, resize the image’s data. Therefore, to speed load times, it is recommended that you keep your image relatively small (under a megabyte). Note also that the PHP max upload settings apply.
System Settings #
General Settings #

Grievance App App Status: If the status is changed to Offline, the client interface will be disabled. This does not, however, affect any normal Agent interaction with the Agent Panel.
Grievance App App URL: This URL is the base of your Grievance App App installation. It is used in email communication to direct Users back to your Grievance App.
Grievance App App Name/Title: This is the title that appears in the browser tab. Also, if your Grievance App App page is bookmarked, this will be the title/name of the site page.
Default Department: Choose a default Department for grievances that are not otherwise routed to a specific department. Grievance Apps can be routed-based on help topics, incoming emails, and grievance filter settings.
Force HTTPS: This setting allows Admins to configure wether or not they want to Force HTTPS system-wide. If enabled, any request that is using the HTTP protocol will be redirected to the HTTPS protocol. Note, this will only work if you have an SSL certificate installed and have HTTPS configured on the server.
Collision Avoidance Duration: Enter the maximum length of time an Agent is allowed to hold a lock on a grievance or task without any activity. Enter 0 to disable the lockout feature.
Default Page Size: Choose the number of items shown per page in the Grievance App Queues of the Agent Panel. Each Agent can also customize this number for their own account under My Preferences.
Default Log Level: Determine the minimum level of issues which will be recorded in the System Log. Debug represents the least severity, and Error represents the greatest severity. For example, if you want to see all issues in the System Logs, choose Debug.
Purge Logs: Determine how long you would like to keep System Logs before they are deleted. System logs are located at Admin Panel > Dashboard and include Error Messages, Warnings, or Debug events of the Grievance App App.
Show Avatars: Enable this to show Avatars on thread correspondence. The Avatar Source can be set in Agents’ and Users’ settings pages.
Enable HTML/Rich Text: If enabled, this will permit the use of rich text formatting between Clients and Agents.
Allow iFrames: This is a setting to allow specified domains to use your Grievance App Appin an iFrame. By default no one is allowed to use your Grievance App Appin an iFrame for security purposes. If however you’d like to use your Grievance App Appin an iFrame on your company website/forum/etc you can enter the site domain in the Allow iFrames textbox and the site will be able to use your Grievance App Appin an iFrame. This option accepts domain wildcards, HTTP/HTTPS URL scheme, and port numbers. For more information on these formats view the <host-source> options in this link. Example: https://domain.tld, sub.domain.tld:443, http://*.domain.tld
Embedded Domain Whitelilst: Enter a comma separated list of domains to be whitelisted for iFrames used in the system. Do not input http(s) or www with the domain; only the domain name will be accepted. This is used when you would like to embed content in the system (eg. YouTube video) via Client Portal, Knowledgebase, etc. If you add an iFrame with a non-whitelisted domain, the system will remove the iFrame automatically. By default the system allows YouTube, Vimeo, DailyMotion, and Microsoft Stream. Example: domain.tld, sub.domain.tld
ACL: ACL (or Access Control List) is a feature allowing you to limit access to your entire Grievance App App(or specific panels) to a list of IP addresses. See full documentation here.
Date & Time Settings
Date & Time Options Section:
The following settings define the default settings for Date and Time settings for the Grievance App App. You can choose to use the locale defaults for the selected locale or use customize the formats to meet your unique requirements. Refer to the ICU format strings as a reference for customization. The dates shown below simply illustrate the result of their corresponding values.
Default Locale: Can be based on Language Preference or select other available options from the drop down. Please note, any included language packs will expand the local options available.
Default Time Zone: Can be auto detected or selected from available options in the drop down.
Date & Time Format: Can choose from Locale Default, Locale Defaults with 24-hour time or Advanced for specific time/date formatting options of the the ICU Date Formatting Table
ADVANCED:
Time Format: Format of the time as seen throughout the Grievance App App.
Date Format: Date format preference for the Grievance App App.
Date and Time Format: Format of the Date and Time of the Grievance App App.
Day, Date, and Time Format: Where applicable, format of the Day, Date, and Time stamp of the Grievance App App.
System Languages: Choose a system primary language and optionally secondary languages to make your interface feel localized for your agents and Users.
Primary Language: Content of this language is displayed to agents and Users if their respective language preference is not currently available. This includes the content of the interface as well as custom content, such as thank-you pages and email messages. This is the language in which the untranslated versions of your content should be written.
Secondary Language: Select language preference options for your agents and Users. The interface will be available in these languages, and custom content, such as thank-you pages and help topic names, will be translatable to these languages.
Attachment Settings and Storage: Configure how attachments are stored.
Store Attachments: Choose how attachments are stored; in the database or in additional storage backends which can be added by installing storage plugins.
Agent Maximum File Size: Choose a maximum file size for attachments uploaded by agents. This includes canned attachments, knowledge base articles, and attachments to grievance and task replies. The upper limit is controlled by PHP’s upload_max_filesize setting.
Login Required: Enable this setting to forbid serving attachments to unauthenticated users. That is, users must sign into the system (both end users and agents), in order to view attachments. From a security perspective, be aware that the user’s browser may retain previously-viewed files in its cache. Furthermore, all file links on your Grievance App Appautomatically expire after about 24 hours.
Grievance Apps Settings #
Settings #

Name Formatting: Format for Agents names throughout the system.
Agent Identity Masking: If enabled, this will hide the Agent’s name from the Client during any communication.
Avatar Source: Choice of where you want your Avatars to come from.
Configurable Agents As Collaborators: This allows Admins to globally configure the ability for Agents to be added as Collaborators via any communication on grievances. In some use cases Agents do not want to be added as Collaborators on grievances to avoid an overload of emails/alerts, etc. This adds a new checkbox labeled Disable Agent Collaborators to Admin Panel > Settings > Agents that if Enabled/Checked will automatically Disable Agents that are added as Collaborators. This disables the participant alerts for the Agents whilst giving other Agents/Admins the ability to enable them at a later date instead of having to manually add them back. If an Agent tries adding another Agent as a Collaborator via the Manage Collaborators modal it will also Disable the Agent Collaborator.
Password Expiration Policy: Choose how often Agents will be required to change their password. If disabled, passwords will not expire.
Allow Password Resets: If enabled, displays the Forgot My Password link on the Staff Log-In Page after a failed log in attempt.
Reset Token Expiration: Choose the duration (in minutes) for which the Password Reset Tokens will be valid. When an Agent requests a Password Reset, they are emailed a token that will permit the reset to take place.
Agent Excessive Logins: Choose how many failed login attempt(s) allowed before a lock-out is enforced as well as how long the lock will be.
Agent Session Timeout: Choose the maximum idle time (in minutes) before an Agent is required to log in again.
Bind Agent Session to IP: Enable this if you want Agent to be remembered by their current IP upon Log In.
Templates #
Agent Welcome Email: Initial (optional) email sent to staff members when accounts are created for them in the staff control panel
Sign-in Login Banner: This is the initial message and banner shown on the staff login page.
Password Reset Email: Template of the email sent to staff members when using the Forgot My Password link.
User Settings #
Settings #
Registration can be required for Users to create grievances on the Grievance App App to prevent random grievances or to limit Users’ accessibility to the Grievance App App.
If Registration is required, there are a few options of registration methods for end-users


Registration is an important feature for Users to check grievance statuses or see all of their grievances in the Grievance App App. A User can follow the link in the auto response to check the status of a grievance, or they can Login to the client portal to a grievance with the grievance number and their email address. This will then send a link to their email for them to follow back to that one, singular grievance. A User must be registered to Login to view all grievances associated with their name.
Users can easily check the status of a grievance with their email address and a grievance number if the Click Quick Access box is unchecked.
Templates #
All Email Templates for Authentication and Access are editable and located in the Access sub-tab. Also located in this sub-tab is where the Sign-In Pages for both agents and Users can be edited. All templates contain an HTML/Rich Text toolbar when text is highlighted.
Guest Grievance App Access: Grievance App access link sent to clients for guest-only systems where the grievance number and email address will trigger an access link sent via email .
Sign-In Page: This forms the header on the staff login page.
Password Reset Email: Template of the email sent to clients when using the Forgot My Password link on the login page.
Please Confirm Email Address Page: Template of the page shown to the user after registering for an account.
Account Confirmation Email: Confirmation email sent to clients when accounts are created for them by staff or via the client portal.
Account Confirmed Page: Page shown to the user after successfully registering and confirming their account.
Knowledgebase Settings #
Options & Settings #

Knowledgebase Status:
Enable Knowledge Base: Allows your Users self-service access to your public knowledgebase articles.
Require Client Login: Requires all Users to log in before they can view knowledgebase articles.
Canned Responses: Enable this setting to allow Agents to use Canned Responses when replying to grievances.
Help Topics #
Create and Assign Help Topics #
Help Topics will help streamline your end-user’s Grievance App App experience to ensure proper assignment and prompt response to the grievance. Create as many Help Topics as needed and can even nest Help Topics within each other for further breakdown (For example, Human Resources and Human Resources/Payroll.)
Help Topics will determine what Department the grievance is routed to which will determine which Agents have access to the grievance. The Help Topic also can determine other configurations of the grievance, such as the grievance’s SLA (or Service Level Agreement) and priority of a grievance, i.e. Emergency to Low.
There are two places where the Help Topic must be selected on New Grievance Apps; the client portal and new grievances created internally by staff. When Users select the Help Topic, they are not aware of the configurations in place for that Help Topic.
Admin Panel > Manage > Help Topics > Add New Help Topic or click on existing topic to edit the following:
Help Topic Information Tab:

Topic: This is the name of the Help Topic as it will appear to the end-user.
Status: Must be set to “Active” to be utilized; if disabled, the topic will not appear in the drop down.
Type: If topic is selected as “Private,” it will only be visible when a grievance is created internally by an Agent from the Staff Control Panel (Agent Panel > Grievance Apps > New Grievance App).
Parent Topic: Topics can be nested together to further streamline the client’s selection of topics. The Parent Topic will show up first in the drop down followed by the topic name. Even though it is nested, the child topic’s settings will override the Parent Topic’s settings.
New Grievance App Options Tab:

Department: Grievance Apps with this help topic will be assigned to specified department. Department defaults will be associated with this grievance unless otherwise specified. You can choose the templates that will be used for autoresponse and staff alerts (which will have the department signature if the signature variable is included.)
Grievance App Number Format: Custom grievance number formats can be created and associated to grievances opened under this help topic.
Status: Grievance Apps can assigned to a status automatically.
Grievance App Priority: This will determine the grievances sort order in the Open Grievance Apps queue of the Agent Panel. By default, grievances will sort in descending order.
SLA Plan: If the specific help topic requires a different SLA Plan than the assigned department, you can assign an SLA Plan to override the department SLA auto-assigned to the department. SLA’s can be created at Admin Panel > Manage > SLA Plans.
Thank You Page: Once the client creates a grievance, you can create/edit the Thank You Page they are directed to. Pages can be created and/or edited at Admin Panel > Manage > Site Pages.
Auto-Assign: Grievance Apps can be Auto-Assigned to an agent or a team when this help topic is chosen.
Grievance App Auto-Response: When disabled, no auto-response will be sent to client if this help topic is chosen. If grievance is created internally, no response will be sent UNLESS the agent creating the grievance selects for an Auto Response to be sent to the email address of the grievance.
Forms Tab:

Custom Form: Extra information for grievances associated with this help topic. Custom Forms can be created at Admin Panel > Manage > Forms. The fields of the form will appear once the Help Topic is selected.
Fields can be individually disabled by help topic. These fields would not appear on the new grievance form if disabled.
Grievance App Filters #
How to Create Grievance App Filters #
Grievance App Filters are a set of “If ____, Then____” rules that create auto actions for new grievances based on the criteria set forth in the filter. The rules of the filter are applied only to grievances upon creation specific to how the grievance is created.
You can create Grievance App Filters associated with information pulled from the email or grievance, such as a name, email address, organization, etc., and can create an auto-response (if desired) connected with a related Canned Response.
Admin Panel > Manage >Grievance App Filters > Add New Filter:
Update/Add New Filter Section #
Filter Name: Name given to filter for internal use only
Execution Order: This is a numeric listing of the order you want the grievances to be filtered. You can choose to stop filtering if the criteria for the filter is met- this is best utilized in determining rejected grievance filters.
Filter Status: Active or Disabled
Target: This is the source of creation of the grievance or the means by which the grievance was created. This will further specify which grievances the filter will be applied. There are 5 Targets to choose from only one can be chosen.
ANY: Applies filter to any grievances that originated from Web forms, API calls, and emails.
Web Forms: Applies filter to any grievances that originated from the Client Portal.
API Calls: If enabled, any grievances created through the API Feature will be processed for the filter if the filter criteria is met.
Emails: Grievance Apps created from any/all emails sent to the system to create grievances.
Specific Email: A specific email address in the Grievance App App utilized to create new grievances in the system.
Filter Rules Section #
Up to 25 rules can be added in the Filter Rules section. If adding more than 4 rules to a filter, configure the actions for the entire filter after adding the first four rules and click “save changes” to view more rule boxes.
The rules criteria selection is from any field available in the grievance including custom forms, fields, lists and list properties.
Matching Methods:
Match Any versus Match All: If you would like the filter to match ANY of the rules, and then stop- choose Match Any. If you would like all rules of the filter to be matched- choose Match All.
Filter Action Section #
Reject Grievance App: If this is selected, no grievance will be created, therefore, save changes because all other actions below this action are invalid.
Use Reply-To Email: Reply to the specified Reply-To email address in the header of the grievance.
Grievance App Auto-Response: Disable auto-responses to client if the filter rules are met.
Attach Canned Response: Send a canned response to the client if the filter rules are met.
Set Department: Auto-Assign to a specific Department if filter rules are met.
Set Status: This will determine the grievance status once created if the filter rules are met.
Set Priority: Assign priority to grievance when rules are met; this will override assigned department priority
Set SLA Plans: Assign SLA plan when rules are met; this will override assigned department SLA
Auto-Assign To: Auto-assign to specific Staff or Team when rules are matched.
Set Help Topic: Grievance App can be assigned a specific help topic, which, if applicable, will also add any custom form associated with that Help Topic.
Send Email: Send an email to the client if the filter rules are met.
SLA Plans #
Create A New SLA Plan #
SLA Plans or Service Level Agreements, are unlimited in Grievance App App. The purpose of the SLA Plan is to provide a length of time in which the Grievance App App Administrator expects grievances to be closed.
SLA Plans can be created by going to the Admin Panel > Manage > SLA Plans. Click on the top right of the table to “Add New SLA Plan.”
One configuration to note with each SLA Plan is whether it can be overridden on Department transfer or change of Help Topic by being Transient. Transient SLAs are considered temporary and can be overridden by a non-transient SLA on Department transfer or when its Help Topic is changed.
Once created, SLA Plans can be determined for Departments, Grievance App Filters, and Help Topics. There is also a System Default SLA Plan which can be chosen by going to Admin Panel > Settings > Grievance Apps.
When a grievance is created internally from the Staff Panel, agents can choose an SLA Plan which will override any other assignments to a Department or Help Topic. Agents can also select a Due Date for the grievance which, if passed, will cause the grievance to become overdue. No SLA plan can override a due date.
If a grievance is created from the Client Interface, the SLA Plan associated with the Help Topic will be in effect unless a Grievance App Filter is in place and the criteria is met; then the SLA Plan associated with the Grievance App Filter will be in effect.
For grievances created via email, the department that the email address is assigned to will determine the SLA plan of the grievance unless a Grievance App Filter is in place and the criteria is met; then the SLA Plan associated with the Grievance App Filter will be in effect.
Admin Panel > Manage > SLA Plans:
Service Level Agreements: SLA Plans can be set by help topic and department to ensure the grievance is CLOSED in the allotted or specified amount of time.
Name: Plan name to be selected when assigning.
Grace Period: Amount, in hours, before grievances with this SLA will become overdue if not closed in allotted time.
Status: Choose Active or Disable for the plan.
Transient: SLA can be overridden on grievance transfer or help topic change; if not transient, the SLA will remain the same as it is assigned on grievance creation.
Grievance App Overdue Alerts: This will DISABLE overdue alert notices to staff for grievances assigned this SLA.
Schedules #
Setting up a schedule lets you specify hours of operation for your Grievance App App so that Grievance Apps will only be marked overdue during those times.
Schedules tie into your Grievance App’s SLA, or service level agreement, which is the amount of time given to respond to a grievance that comes into the Grievance App Appbefore it is marked overdue.
You can see the SLA’s you have setup by going to
Admin Panel | Manage | SLA

If you assign a Schedule to an SLA, Grievance Apps will only be marked as overdue within the Business Hours specified in that Schedule.

#
Create a Schedule #
Let’s take a look at how to create a schedule.
You can create and configure schedules by going to
Admin Panel | Manage | Schedules

We have several schedules set up by default that can be used or reconfigured to meet your own needs.
There are 2 types of Schedules:
- Business Hours which are the hours in which your Grievance App Appoperates
- Holiday Hours which are special exceptions that should be applied to your normal hours of operation
Business Hours #
First, we’ll go over how to create business hours.

For the timezone, we recommend leaving it blank. This will apply the schedule to the default timezone set in the Grievance App. You can, however, force a specific timezone if you wish.


Once your schedule is created, you can add entries to it

Let’s say your company operates Monday – Friday from 9am to 5pm. To set this up, we can create an entry for weekdays, specifying those times.


Note: If you need to set up different hours of operation per day, for example, Monday – Thursday 9am to 5pm and Friday 9am to 12pm, you would need to create an entry for each day.


#
Holiday Hours #
After you have specified the hours your Grievance App Appworks, you can specify which hours your Grievance App Appis not in operation by setting up Holiday Hours.
Let’s say that next Monday is a holiday for the company who uses my Grievance App. First, I would need to create the Holiday.


I want this holiday to fall on Monday, March 23rd each year.


Now that I have the holiday set up, I will apply it to the schedule I have created.


Diagnostics #
After you have everything configured, you have the option to look at a diagnostic tool to show what your working schedule will look like.


The number of hours you specify will show what you schedule will look like for that number of working hours.
So, if I have 24 hours in the blank, I will see what the next 24 working hours in my Grievance App Applook like.
As you can see, the schedule shows the holiday we have entered as skipped hours, and it picks up the following day.

#
Clone a Schedule #
You also have the ability to clone a schedule using the same dropdown


Now that we have built out the schedule and assigned holidays to it, we can specify where the schedule should be used.
Schedules can be assigned in several places in the Grievance App.
System Default Schedule #
You can choose a default schedule for the whole system.
Settings | System


#
Department Schedule #
Departments can be assigned a schedule as well.
Agents | Departments | choose Department


If no Schedule is chosen, the SLA’s default Schedule will be assigned.
If the SLA doesn’t have a Schedule specified, the System Default Schedule will be applied.
If your Grievance App Appdoesn’t have a default Schedule chosen, your Grievance Apps will be marked overdue based on the SLA assigned to the Grievance App.
API Keys #
Adding/Enabling/Disabling/Deleting an API Key #
The Grievance App App API built into Grievance App App allows you to write your own html forms and push the data into Grievance App App to open grievances.

In this section, API keys can be added with the ‘Add New API Key’ button, and they can be enabled/disabled/deleted by clicking on the checkbox next to the key, then clicking on the top right drop-down menu.
The following image is the information page where an API Key can be entered and Added. At this page, the API Key can be set to Active or Disabled, the IP address of the server that hosts the software. Then, Grievance App Creation and Cron services can be enabled for the key. Finally, an internal note can be inserted to note the reason for this key.

Pages #
How to Edit Site Pages #
Your Site Pages are what End-Users will view at various points when they are on the Client Portal.
These pages include:
Landing Offline Thank You
The Landing page is the first view an End-User will see when they access the Client Portal. It is where the end-users are welcomed, allowed to create a grievance, and can check the status of grievances.
The Offline pages appears to end-users when the Grievance App App is disabled.
The Thank You page appears once the end-user has created and submitted a grievance but is not logged into the client portal of the Grievance App App.
To edit these Site Pages, locate the Manage tab in the Admin Panel and select Pages. Then, click on the title of the page to be edited. Edit the page as desired- this can include logos, pictures, screenshots, YouTube videos, etc., to customize the page to meet specific needs.
Once done editing the page, click Save Changes at the bottom to save edits.
Forms #
Creating and Using Forms #
A great way to customize the Grievance App App to suit your unique use case is to add custom fields to either a built-in form for each grievance created from the Client Portal or internal grievances opened by agents. Included in the Grievance App App are Built-In Forms and the ability to create Custom Forms.
Custom Forms #
Custom Forms allow you to create a variety of answer fields which are all customizable. Fields can be listed as internal- to be utilized by staff for internal grievance creation or when editing an existing grievance; or required for when the user submits a grievance. These Custom Forms can then be added to Help Topics to help improve workflow by capturing any required information from the user when submitting a grievance.
To assign a Custom Form to a Help Topic, go to Admin Panel > Manage > Help Topics > and select desired help topic. In the Forms Tab of the selected Help Topic, choose custom form from the drop down to be added when clients or staff are creating a new grievance. Multiple Custom Forms can be added to each Help Topic but only one of each Custom Form.
Custom Forms can also be amended to a grievance, a user profile or an Organization by utilizing the “More” quick button on the top right corner.
Built-In Forms #
These forms are included on each new grievance that is created by client or staff; regardless of Help Topic selected. Currently, the software ships with Contact Information, Grievance App Details, Task Details, Organization Information, and Company Information as Built-in Forms which are included on each new grievance created. We suggest you preview these built-in forms to see the information contained in them. All can be edited to further work with your company’s workflow. Fields which are marked “Required” will show in bold on the grievance form.
Contact Information: This is the information associated with users in your Grievance App App. This information will not be visible along the grievance header- only with the user’s profile if you click on their name on the grievance header. You can also view and edit this information in the User Directory.
Company Information: This is referring to your Grievance App App company information and can be pulled into email templates, signatures, or canned responses utilizing the variables.
Organizational Information: You can expand the information you include when creating Organizations in your User Directory. This information will only be visible internally by your Grievance App App Agents when they are reviewing the information associated with the Organizations.
Grievance App Details: The information in these fields are collected on each grievance created when Users go to your Client Portal and click “Open a New Grievance App” or when grievances are created internally by Agents. These fields can be deemed required and/or internal.
Task Details: The information in these fields are collected on each grievance created when Users go to your Client Portal and click “Open a New Grievance App” or when grievances are created internally by Agents. These fields can be deemed required and/or internal.
Field Types and their possible configurations include:
Short Answer: You can limit the number of characters (including spaces) someone can enter into the field.
Config box:
Field Setup-
Size: Width, in characters, that the field box will appear for data entry.
Max Length: The maximum amount of characters someone can type in the field (up to 64,000).
Validator: Select from the list of available validators for the information requested in the short answer including:
IP Address
Phone
Email Address
Number
Custom (regular expression)
Regular Expression
Validator Error: Error message the end-user will see if the information in the field does not match the validator.
PlaceHolder: Text that will appear in the box until the user clicks in the box to input text.
Help Text: Text that will appear under the field to help users and agents creating grievances get a better understanding of the information being gathered.
Settings:
Enabled: This field can be disabled, which will remove it from the form for new entries but will preserve the data on all current entries.
Visible: Making fields visible allows agents and end-users to view and create information in this field.
Required: Determines if information is necessary for new entries to be created All required fields must have valid data.
Editable: Fields marked editable allow agents and end-users who are the grievance owner to update the content of this field after the form entry has been created.
Require Entry: Optionally, this field can prevent closing a thread until it has valid data.
Long Answer: Allows users to include a large amount of text in a form. You can configure to limit as necessary. If there is HTML content in a Long Answer field we will show only the plain-text content in the grievance header and to view the full HTML content you can click the field in the header to view it.
Config box:
Field Setup-
Width (chars): Width, in characters the text box will be sized.
Height (rows): Number of rows the text box will appear in height.
Max Length: Maximum number of characters allowed to be typed in the box.
Allow HTML: Enable the HTML/Rich Text toolbar for the end-users.
Placeholder: Text that will appear in the box until the end-user clicks on the box to type text.
Help Text: Text that will appear under the field to help your end-users and agents creating grievances get a better understanding of the information being gathered.
Settings:
Enabled: This field can be disabled, which will remove it from the form for new entries but will preserve the data on all current entries.
Visible: Making fields visible allows agents and end-users to view and create information in this field.
Required: Determines if information is necessary for new entries to be created All required fields must have valid data.
Editable: Fields marked editable allow agents and end-users who are the grievance owner to update the content of this field after the form entry has been created.
Require Entry: Optionally, this field can prevent closing a thread until it has valid data.
Date & Time: Allows end-users to select a date from the calendar as well as time. Time is formated in Military Time.
Config box:
Field Setup-
Time: Show time selection with date picker.
Time Zone Awareness: Show date/time relative to user’s timezone.
Earliest: Choose the earliest date the end-user can select.
Latest: Choose the latest date an end-user can select.
Allow Future Dates: Check to allow the end-user to choose a date in the future
Help Text: Text that will appear under the field to help your end-users and agents creating grievances get a better understanding of the information being gathered.
Settings:
Enabled: This field can be disabled, which will remove it from the form for new entries but will preserve the data on all current entries.
Visible: Making fields visible allows agents and end-users to view and create information in this field.
Required: Determines if information is necessary for new entries to be created All required fields must have valid data.
Editable: Fields marked editable allow agents and end-users who are the grievance owner to update the content of this field after the form entry has been created.
Require Entry: Optionally, this field can prevent closing a thread until it has valid data.
Phone Number: To enter a phone number from end-user; can be between 7-16 digits.
Config box:
Field Setup- Extension: Check the box for the end-user to be able to input an extension into a separate field than the phone number.
Minimum Length: Fewest digits allowed for a valid phone number.
Display Format: Currently, only format available is US.
Help Text: Text that will appear under the field to help your end-users and agents creating grievances get a better understanding of the information being gathered.
Settings:
Enabled: This field can be disabled, which will remove it from the form for new entries but will preserve the data on all current entries.
Visible: Making fields visible allows agents and end-users to view and create information in this field.
Required: Determines if information is necessary for new entries to be created All required fields must have valid data.
Editable: Fields marked editable allow agents and end-users who are the grievance owner to update the content of this field after the form entry has been created.
Require Entry: Optionally, this field can prevent closing a thread until it has valid data.
Check Box: Can be utilized in questions requiring only one answer.
Config box:
Field Setup- Description: Text to be shown inline with checkbox widget.
Help Text: Text that will appear under the field to help your end-users and agents creating grievances get a better understanding of the information being gathered.
Settings:
Enabled: This field can be disabled, which will remove it from the form for new entries but will preserve the data on all current entries.
Visible: Making fields visible allows agents and end-users to view and create information in this field.
Required: Determines if information is necessary for new entries to be created All required fields must have valid data.
Editable: Fields marked editable allow agents and end-users who are the grievance owner to update the content of this field after the form entry has been created.
Require Entry: Optionally, this field can prevent closing a thread until it has valid data.
Choices: Allows you to enter items that are chosen by end-user in a dropdown box
Config box:
Choices: Enter the list choices (one per line) for end-users to select from. To protect against spelling changes, “specify key:value names” to preserve entries if the list item names change. For example, in the list below, the key is the number before the value name: 1: Apple 2: Orange 3: Banana
Default: Enter the key value for the item in the choices that the system will default to when the grievance is being created. end-users can select a different value from the list if that is not the choice for them.
Prompt: Leading text shown on the drop down field for the end-user if there is no default choice entered in the configurations.
Multi-select: Enable end-users to choose more than one choice from the drop down box
Help Text: Text that will appear under the field to help your end-users and agents creating grievances get a better understanding of the information being gathered.
Settings:
Enabled: This field can be disabled, which will remove it from the form for new entries but will preserve the data on all current entries.
Visible: Making fields visible allows agents and end-users to view and create information in this field.
Required: Determines if information is necessary for new entries to be created All required fields must have valid data.
Editable: Fields marked editable allow agents and end-users who are the grievance owner to update the content of this field after the form entry has been created.
Require Entry: Optionally, this field can prevent closing a thread until it has valid data.
Section Break: This feature allows distinction of form sections by adding a break with a title. The field label will show up in a grey box that has extended the width of the form.
Config box:
Field Setup- Help Text: Text that will appear under the field to help your end-users and agents creating grievances get a better understanding of the information being gathered.
Settings:
Enabled: This field can be disabled which will remove it from the form for new entries, but will preserve the data on all current entries.
Visible: Making fields visible allows agents and end-users to view and create information in this field.
Information: This field does not require input from the end-user nor the agent when creating a grievance. It is simply a way to communicate some sort of information.
Config box:
Field Setup- Content: Type your message here in a lighter, italicized font.
Help Text: Text that will appear under the field to help your end-users and agents creating grievances get a better understanding of the information being gathered.
Settings:
Enabled: This field can be disabled, which will remove it from the form for new entries but will preserve the data on all current entries.
Visible: Making fields visible allows agents and end-users to view and create information in this field.
Required: Determines if information is necessary for new entries to be created All required fields must have valid data.
Editable: Fields marked editable allow agents and end-users who are the grievance owner to update the content of this field after the form entry has been created.
Require Entry: Optionally, this field can prevent closing a thread until it has valid data.
File Upload: Allows End-Users to include attachments in association with custom fields other than the Issue Details field located in the Grievance App Details form. Please note; attachments can be required for grievance creation if this field is marked as required.
Config box:
Field Setup- Max File Size: Choose maximum size of a single file uploaded to this field.
Restrict by File Type: Optionally, choose acceptable file types.
Additional File Type Filters: Optionally, enter comma-separated list of additional file types, by extension. (e.g .doc, .pdf)
Max Files: Enter the maximum number of files users can upload per response.
Help Text: Text that will appear under the field to help your end-users and agents creating grievances get a better understanding of the information being gathered.
Settings:
Enabled: This field can be disabled, which will remove it from the form for new entries but will preserve the data on all current entries.
Visible: Making fields visible allows agents and end-users to view and create information in this field.
Required: Determines if information is necessary for new entries to be created All required fields must have valid data.
Editable: Fields marked editable allow agents and end-users who are the grievance owner to update the content of this field after the form entry has been created.
Require Entry: Optionally, this field can prevent closing a thread until it has valid data.
Built-In:
Priority Level: (Low, Normal, High, Emergency) If selecting this as a required field, it will override the priority level of the Help Topic & Department.
Department: This field will populate the public Departments of the Grievance App App
Assignee: This field will populate a list of all Agents of the Grievance App App.
Settings:
Enabled: This field can be disabled, which will remove it from the form for new entries but will preserve the data on all current entries.
Visible: Making fields visible allows agents and end-users to view and create information in this field.
Required: Determines if information is necessary for new entries to be created All required fields must have valid data.
Editable: Fields marked editable allow agents and end-users who are the grievance owner to update the content of this field after the form entry has been created.
Require Entry: Optionally, this field can prevent closing a thread until it has valid data.
Custom Lists:
You must first CREATE a custom List in Admin > Manage > Lists before it will show up in the “Type” of field.
Config box:
Field Setup- Multi-select: Enable end-users to choose more than one choice from the drop down box
Widget: Select the type of List you would like the field to be: Typeahead, Dropdown, or Text Entry.
Prompt: Leading text shown on the drop down field for the end-user if there is no default choice entered in the configurations.
Default: Select the default value for the field from the list items in the drop down; the system will default to this choice when the grievance is being created. end-users can select a different value from the list if that is not the choice for them.
Help Text: Text that will appear under the field to help your end-users and agents creating grievances get a better understanding of the information being gathered.
Settings:
Enabled: This field can be disabled, which will remove it from the form for new entries but will preserve the data on all current entries.
Visible: Making fields visible allows agents and end-users to view and create information in this field.
Required: Determines if information is necessary for new entries to be created All required fields must have valid data.
Editable: Fields marked editable allow agents and end-users who are the grievance owner to update the content of this field after the form entry has been created.
Require Entry: Optionally, this field can prevent closing a thread until it has valid data.
Lists #
Create New Custom List #

Custom Lists permit the creation of dropdown boxes with predefined options from which an End-User can select on a form. Create a Custom List by going to Admin Panel > Manage > Lists> Add New Custom List. The list will show up as a Field Type when creating a field on either a Built-In or Custom Form. Abbreviations are encouraged where applicable as these will be used in association with a list configured as a Type Ahead instead of Drop Down. This Type of List is recommended when you have more than 3 choices.
Additional information can be associated with each List item which will be available for Agents to view.

Item Properties help define additional information for which is unique for each List item. The properties will need to be determined when creating the List and then defined per List item.

Custom Lists can then be added to a Custom Form which will allow the specific information to be captured from the End-Users and Agents when creating grievances.

Once an End-User selects a Help Topic that has a Custom Form with the List you’ve created they will be able to see the List and select a value.

Definition
Name: Name of the custom list. (required)
Plural Name: Plural version of the custom list Name. (not required)
Sort Order: Order you would like the list to be sorted.
Internal Notes: Section for any notes you would like to add.
Properties
Label: Name of the list item.
Type: The type you would like the list item to be.
Visibility: Whether or not you want the item to be seen.
Variable: Variable name for the list item.
Delete: Whether or not you want to delete the list item.
Creating Custom Grievance App Statuses #
Agents can change the status of a grievance as it progresses through the workflow. Grievance App statuses can be automatically configured for the system default, by Help Topic or Grievance App Filter upon grievance creation. After creation, status changes must be done manually by agents from within each individual grievance or can be mass changed from the grievance queues of the Grievance App App.
Grievance App statuses are set to either an “Open” or “Closed” state but can be titled anything within the Grievance App App. Statuses can also be marked as not reopenable by and end user which, when a grievance is set to such a status, a response from an end user (grievance owner or collaborator) will create a new grievance and not thread into the original; the new grievance will reference the old grievance number in the subject.
To add a custom status, go to the Admin Panel > Manage > Lists > Grievance App Statuses. This is a built-in list which can be expanded to include an unlimited number of Custom Grievance App Statuses. Click on the Add New Item to label the Status name in the “Value” box; configure the state (Open or Closed) of the new Grievance App Status in the Properties tab of the pop-up box. If selecting a Closed state with the grievance status, additional boxes will populate in the tab to determine if the grievance can be reopened by the end user’s response as well as what Open state status it is to be set to upon reopen.
Only agents with the ability to close grievances will have access to grievance statuses which are set to a closed state; otherwise, agents will only see grievance statuses set to an Open state. Grievance Apps created via email will be set to the Default grievance status set in the Admin Panel > Settings > Grievance Apps unless overridden by a Grievance App Filter. Web grievances will be set to the status associated with the Help Topic selected unless criteria of a Grievance App Filter match and override.
lugins #
Video Tutorial:
Add New Plugin #

Optionally, configurations such as the Department the grievance will be routed to as well as assigning a Help Topic can be determined for this email address.

Once you fill out this page with the needed information you will click Submit to finish creating the new email. After submission you will see two new tabs Remote Mailbox and Outgoing (SMTP).
To configure email fetching click the Remote Mailbox tab. Here you can fill in the information for the email address.
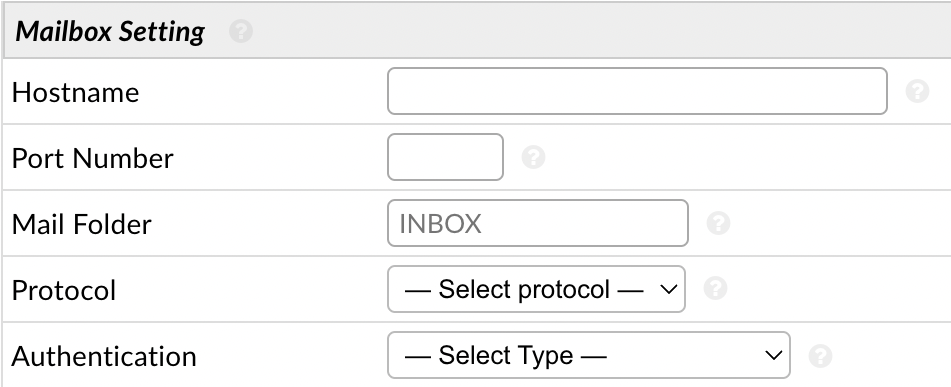
Hostname: The IMAP/POP3 hostname for your mail server. You can check your provider’s documentation for the specific hostname to use.
Port Number: The IMAP/POP3 port number for your mail server. This may be available in the documentation for your hosting account or from your email administrator. If using non standard Port number with SSL enabled then prefix the hostname with ssl:// or tls:// scheme to hint to supported encryption.
Mail Folder: Enter the Folder name that you wish to fetch mail from. If left empty the system will fetch from the INBOX.
Protocol: Select the mailbox protocol supported by your remote mail server. IMAP on a secure port is highly recommended.
Authentication: The authentication method you want to use for the IMAP/POP3 connection. By default you have the option of Basic Authentication. If you want to use OAuth2 you must install [the auth-oauth2 plugin](link to oauth2 guide).
Basic Authentication (Legacy): This is your run of the mill Username + Password authentication. Most major providers are phasing this out for Modern Authentication (OAuth2) but if you run your own mail server you may still need to use this option.
OAuth2 – Google: This provides a template with pre-filled information for Google OAuth2; making setup a little easier.
OAuth2 – Microsoft: This provides a template with pre-filled information for Microsoft OAuth2; making setup a little easier.
OAuth2 – Other Provider: This provides a blank template for a 3rd party OAuth2 provider.
Once you configure Authentication you can then finish the remaining Email Fetching section.

Status: Enable or Disable Email Fetching.
Fetch Frequency: Enter how often, in minutes, the system will poll the mail box. This will define the average delay in receiving an Auto-Response after a User sends an email to this mail box.
Emails Per Fetch: Enter the number of emails processed at one time.
Fetched Emails: Decide what to do with processed emails:
Move to Folder: This will backup your email from the INBOX to a folder you specify. If the folder does not yet exist on the server, the system will attempt to automatically create it. (Recommended)
Delete Emails: This will delete your email from the INBOX once it is processed.
Do Nothing: This will leave emails in your INBOX. The system will record the message ids of your email and attempt not to refetch it. However, this option may cause duplicate grievances to be created. (Not Recommended)
After you have configured the Mail Account Settings, be sure to enable fetching for the system at Admin Panel > Emails > Settings.

Next, you will need to setup the SMTP configurations for the email address in the last section. Click Enable and fill in the information for the email address.

Status: Enable or Disable Outgoing Email.
Hostname: The SMTP hostname for your mail server. You can check your provider’s documentation for the specific hostname to use.
Port Number: The SMTP port number for your mail server. This may be available in the documentation for your hosting account or from your email administrator. If using non standard Port number with SSL enabled then prefix the hostname with ssl:// or tls:// scheme to hint to supported encryption.
Authentication: The authentication method you want to use for the SMTP connection. By default you have the options of Same As Remote Mailbox, Basic Authentication, or None (No Authentication Required). If you want to use OAuth2 you must install [the auth-oauth2 plugin](link to oauth2 guide).
Same As Remote Mailbox: This will utilize the Authentication method configured in the Remote Mailbox tab if they use the same authentication method and information.
None – No Authentication Required: This option will not use Authentication for the SMTP connection. In some instances (especially when using Relay Ports) no authentication is required to send mail.
OAuth2 – Google: This provides a template with pre-filled information for Google OAuth2; making setup a little easier.
OAuth2 – Microsoft: This provides a template with pre-filled information for Microsoft OAuth2; making setup a little easier.
OAuth2 – Other Provider: This provides a blank template for a 3rd party OAuth2 provider.
Basic Authentication (Legacy): This is your run of the mill Username + Password authentication. Most major providers are phasing this out for Modern Authentication (OAuth2) but if you run your own mail server you may still need to use this option.
Header Spoofing: Enable this to allow sending emails via this mailbox from an address other than the one given in the Email Address setting. This advanced setting is generally used when sending mail from aliases of this mailbox.
Once you have the email’s SMTP setup, you will need to make it your System Default Outgoing email address by going to Admin Panel > Emails > Settings and changing the second to last box to the email address you just configured SMTP for.

If you would like this same address used for each department, you will need to assign the email address as the outgoing email address for each department individually. You can do this by going to Admin Panel > Staff > Department > (click on department name), go to the Autoresponder Settings section, and change the Auto-Response Email.

Settings #
Settings & Options #
The system default email settings can be determined at the Admin Panel > Emails > Settings tab. This includes the Incoming Email global settings, default Outgoing Email address, and enabling Email Fetching.

It can be determined on this sub-tab if Collaborators can be added to grievances via email, if grievances from unregistered (unknown) Users will be accepted, and if Attachments can be emailed to Users from Agents. Please note: Users are considered unknown to your Grievance App App if they are not currently in the User Directory. Users can be added by agents or auto added.
Ban List #
Email addresses that have been banned from the Grievance App App to prevent grievances from being created will be listed here. Email addresses can be added or removed from the Ban List at any time.
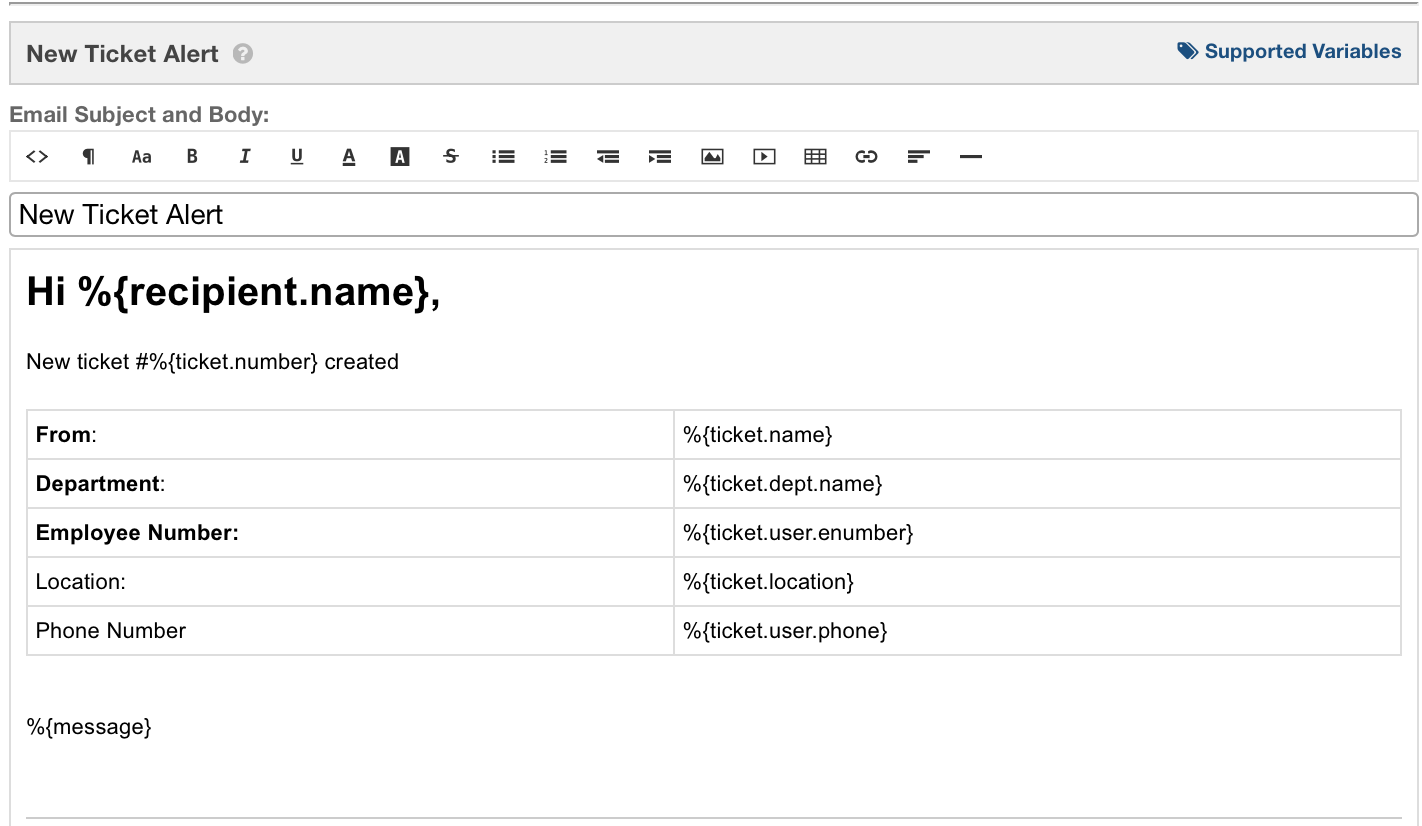
Templates #
OsGrievance App contains stock messages that are sent out to both Agents and End Users during specific events of a grievance’s life cycle. These email message templates can be edited, disabled globally or locally, as well as cloned and assigned to different Departments. When editing, the messages in the templates each have an HTML/Rich Text toolbar for design and brand flexibility.
All templates can include variables which will automatically pull that information (if available) from a submitted grievance.

The entire set of email templates can be cloned for use and assigned to a specific Department of the Grievance App App. This is especially useful if the messages need to be different for grievances assigned to the Department.
Supported variables
An unlimited number of Forms can be built with an unlimited number of fields. You can add a variable name to all fields so that you can use them in Canned Responses and Email Templates. Template Variables utilize the typeahead feature so to populate the available, relevant variables simply type %{ to initiate the Variable Typeahead and then select the variable name.
Various areas of the Grievance App Appcan contain custom fields such as the Contact/User Information form, Grievance App Details form, Organization form, Company Information form, and Task Details form. To use custom form fields in Canned Responses and Email Templates, each variable must be unique.
When editing email templates, only the available variables for use in the message will appear in the drop down. You can further expand the templates where applicable by entering a period after the last character in the variable. This will produce all available extensions for that variable.
Fields on the Organization Information built-in form can be built with this format:
%{grievance.user.organization.field_variable}
Fields on the User Information built-in form can be built with this format:
%{grievance.user.field_variable}
Fields on the Grievance App Details built-in form or a custom form with defined variables can be built with this format:
%{ticket.field_variable}
Fields on the Grievance App Details built-in form or a custom form involving a Custom List with defined Properties can be built with this format:
%{ticket.field_variable.property_variable}
Within each email template there is a Supported Variables option in the upper right corner that will provide a partial list of the variables available. As the forms are built out to contain additional fields there will be more variables available to be used in the email templates and canned responses.

Using both built in form fields and any custom form fields, email templates can be edited to contain the information provided by the End-User if there information in those fields on the forms otherwise the variable name will appear in the email template.
Diagnostics #
Test Outgoing Mail #
Tests whether your Outgoing Email settings are properly established.
Agents #

Agents are given access to the Grievance App App with the intent to respond and resolve the grievances. When adding an Agent to the Grievance App App, they will need to be assigned to a Primary Department and given a Primary Role for the Grievance Apps/Tasks routed to that department. Agents can be given Extended Access to additional departments of the Grievance App App as well as assigned different Roles to those departments; this can be configured in the Access tab of the Agent’s Profile.
Reset an agent’s password
If necessary, administrators can manually reset an agent’s password by clicking the Set Password box in the middle of the Account page. This will produce a pop-up box with two options; the first is to send a password reset email to the agent. Please note, if the agent has not first set a password post-creation they can not reset said password. The second option for the admin is to uncheck the box which will populate fields to manually set a password for the agent. Once manually set, the admin will need to communicate this to the agent allowing them to log-in; the agent can be forced to reset the password upon logging in by keeping the box checked at the bottom left of the pop-up.
Status and Settings
Locked: Agents who are Locked/Disabled are unable to log into the Grievance App App. They will not be visible for assignment or auto assignments. Email alerts will not be sent to disabled agents as well.
Administrator: Agents marked as “Administrators” simply have access to the Admin Panel are able to make global configuration changes to the Grievance App App. All changes are effective moving forward and will not revert to previously configured settings. Agents with access to the Admin Panel can grant additional agents access to this panel for global configurations.
Limit grievance access to ONLY assigned grievances: When this is checked these agents will only see grievances which are directly assigned to them as an agent or a team to which the agent belongs- regardless of department access. Once grievances are set to a status of a closed state, the assignment is released and the agent will lose access to these closed grievances; if the grievance is reopened, the agent could regain access if it is reopened assigned to them.
Vacation Mode: Agents who are on vacation mode are able to log into the Grievance App App but, like Locked/Disabled agents, they will not be visible for assignment or auto assignments and email alerts will not be sent to these agents as well. An agent can manually set themselves to Vacation Mode in their Profile or an agent with access to the Admin Panel. Vacation Mode must be manually enabled as well as disabled.
Agent Access #
Agents are given access to the Grievance App App with the intent to respond and resolve the grievances. When adding an Agent to the Grievance App App, they will need to be assigned to a Primary Department and given a Primary Role for the Grievance Apps/Tasks routed to that department. Agents can be given Extended Access to additional departments of the Grievance App App as well as assigned different Roles to those departments; this can be configured in the Access tab of the Agent’s Profile.
Fall back to primary role For agents without department access which are granted access to grievances via Grievance App Assignment/Grievance App Referral, they will have Primary Role Permissions for grievances if this is checked. Otherwise, Agents will have a view only access to these grievances allowing them to post an internal note only.
Agent Permissions
Users
Create: Ability to add new users
Edit: Ability to manage user information
Delete: Ability to delete users
Manage Account: Ability to manage active user accounts
User Directory: Ability to access the user directory
Organizations
Create: Ability to create new organizations
Edit: Ability to manage organizations
Delete: Ability to delete organizations
Knowledgebase
FAQ: Ability to add/update/disable/delete knowledgebase categories and FAQs
Miscellaneous
Banlist: Ability to add/remove emails from banlist via grievance interface
Search: See all grievances in search results, regardless of access
Stats: Ability to view stats of other agents in allowed departments
Teams #

How to Create Teams In Your Grievance App App #
Teams allow you to pull Agents from different Departments and organize them to handle a specific issue or user via a Help Topic or Grievance App Filter.
Having Agents from different Departments assigned to a Team will supersede the parameters of the Agents’ Department rules. For example, you can create a Help Topic associated with a particular product you produce, and assign it to a Team of specialist Agents from different Departments.
To create a Team in your Admin Panel, locate the Agents tab, and click on Teams. Then click Add New Team on the right, and fill out the appropriate information. Then you will be able to add Agents to the team by clicking on their name from your list of Agents and checking the corresponding box next to the Team name you wish to add them at the bottom of the page.
A Team can have an appointed leader who can receive Alerts & Notices separate from other team members. In order to set a Team Leader you can choose an Agent from the Team Lead dropdown when creating a Team or Editing an existing Team.
Roles #

Roles are the permissions granted to Agents per Department that they have access to. Each Role has a set of permissions that can be checked/unchecked for agents given that Role in association with a Department they have access to. An unlimited number of roles can be created and assigned to Agents with access to various departments.
Role Permissions for Grievance Apps include:
Assign: Ability to assign grievances to agents or teams
Close: Ability to close grievances
Create: Ability to open grievances on behalf of users
Delete: Ability to delete grievances
Edit: Ability to edit grievances
Edit Thread: Ability to edit thread items of other agents
Link: Ability to link grievances
Mark as Answered: Ability to mark a grievance as Answered/Unanswered
Merge: Ability to merge grievances
Post Reply: Ability to post a grievance reply
Refer: Ability to manage grievance referrals
Release: Ability to release grievance assignment
Transfer Ability to transfer grievances between departments
Role Permissions for Tasks include:
Assign: Ability to assign tasks to agents or teams
Close: Ability to close tasks
Create: Ability to create tasks
Delete: Ability to delete tasks
Edit: Ability to edit tasks
Post Reply: Ability to post task update
Transfer: Ability to transfer tasks between departments
Role Permissions for the Knowledge Base include:
Premade: Ability to add/update/disable/delete canned responses
If granted access to the Admin Panel, that Agent will have the ability to make changes in the configurations of the Grievance App App. From the Agent tab of the Admin Panel, the configurations of each Agent of the Grievance App App can be modified, including the ability to Limit an Agent’s access to only grievances that are specifically assigned to them.
The Permissions tab of the Agent profile allows the Agent functionality within the Grievance App App which are not Department specific access items. Areas such as the User Directory, Organization, and Knowledge Base can be limited per Agent. This includes the ability to search for and see the grievance metadata for grievances the Agent does not have access to, the email ban list, and other staff statistics on the dashboard.
Departments #

S
Since grievances are routed through Departments in the Grievance App App, there are many settings that can be set for each Department.
Department Information:
Parent: If nesting departments, this is the Parent Department to nest the department under. Please note: If an agent has access to the Parent Department, they will see the grievances of nested or child departments also, but access does not extend from child departments to Parent Departments.
Status: The status of the department will determine its visibility as well as if grievances can be routed to that department.
Active: The department is available when transferring grievances.
Archived: The department is no longer in use and cannot be selected to transfer any grievance. Also, if grievances in that department are reopened via an End-User response it will create a new grievance referencing the original grievance number and subject line but the department will be the system default.
Disabled: Grievance Apps can no longer be transferred to this department and any grievances set up to be auto routed to this department will now be routed to the default department in the Grievance App. Closed grievances in this department will reopen if the End-User responds.
Name: Department name as it will be displayed throughout the Grievance App.
Type: Select Private if you wish to mask assignments to this Department in the Client Portal. Additionally, when labeled as Private, the Department Signature will not be displayed in email replies. At least one department of the Grievance App App must be Public.
SLA: Service Level Agreement for grievances routed to this Department. This the expected amount of time (in hours) that a grievance is expected to be closed once opened. If the grievance is not closed in the allotted amount of time, it will then be Overdue.
Schedule: Schedule is used by the Service Level Agreement when rendering grievances routed to this Department. This setting takes precedence over System and SLA schedule settings.
Manager: Electively, select a Manager for the departments of the Grievance App App. Managers can be configured to receive special alerts.
Grievance App Assignment: Enable this to restrict grievance assignment to include only members of this Department. Department membership can be extended to based on Agent’s Department Access, if Alerts & Notices Recipients includes those with department access.
Claim on Response: Check this to disable auto-claim on response/reply for this department. Agents can still manually claim unassigned grievances.
Reopen Auto Assignment: Check this to disable auto-assignment of reopened grievances for this department. Otherwise, the Grievance App will be auto assigned to the last responding Agent.
Outgoing Email Settings:
Outgoing Email: Email Address used when responses are sent to Users when Agents post Responses to Grievance Apps.
Template Set: Email Template Set used for Auto-Responses and Alerts & Notices for grievances routed to this Department. Template sets can be cloned and edited for department use in the Admin Panel > Emails > Templates.
Auto Responder Settings: This allows you to override the global Autoresponder settings for this Department.
New Grievance App: If checked, this will disable the New Grievance App Auto-Response sent to the User when a new grievance is created and routed to this Department.
New Message: If checked, this will disable the Auto-Response sent to the User to confirm a newly-posted message for grievances in this Department.
Auto-Response Email: Select an email address from which Auto-Responses are sent for this Department; this email would send only auto-response messages, not Agent responses.